In-App Purchase Tutorial: Auto-Renewable Subscriptions
Auto-renewable subscriptions provide a way of offering your users continuous access to your app’s renewing content – providing them with a great user experience and access to content they care about, and you with an appealing business model.

Version
- Swift 5, iOS 12, Xcode 10

Auto-renewable subscriptions are great. They can help bring your already-pretty-awesome app to the next level and help you earn some extra money along the way. If your app offers consistent or renewable content or collections, adding support for In-App Purchase (IAP) subscriptions may be a good idea.
Auto-renewable subscriptions provide a way of offering your users continuous access to your app’s renewing content – providing them with a great user experience and access to content they care about while giving you an appealing business model.
With auto-renewable subscriptions, you don’t have to stick with the old 70/30 revenue split Apple usually offers. As an incentive for you to offer great ongoing value to your users, Apple will increase your share to 85% at the start of the second year of subscription.
Are you already convinced that your app can benefit from auto-renewable subscriptions? Great, because in this tutorial you’ll learn to do just that.
Getting Started
A couple important things to mention up front. The first is that for this tutorial — and working with IAP in general — you will need a paid Apple Developer account. The free version won’t allow you to set up in-app purchases. Second is you will need to use a real device for this tutorial. Simulators do not support in-app purchases.
To demonstrate the process of adding auto-renewable subscriptions to your app, you’ll use the awesome “Words of Wisdom by Winnie the Pooh” app. It’s a very simple looking app that works great for demonstrating IAP subscriptions.
The initial version of the app offers a single auto-renewable IAP – the right to receive random words of wisdom from Winnie the Pooh for one whole month! This is enough to brighten anyone’s day. But since it’s clear that people will want to continue using it for longer, you should also offer a yearly subscription option. This will prove more valuable to the app’s loyal users.
But, before diving into the implementation details, you may want to take a look at In-App Purchase Tutorial: Getting Started, which provides detailed explanations of the basics of working with Apple’s IAP in general. In this tutorial, you’ll focus on topics that are unique to auto-renewable subscriptions and refer back to the Getting Started guide for more details on general IAP topics.
A couple of disclaimers that are important enough to mention here:
- In the sample app, you’ll use hard-coded Product Identifiers. In real life, you’d prefer the flexibility of fetching these from a server.
- You’ll use
UserDefaultsto indicate that a user has purchased a product. In a real app, you’ll need to perform receipt validation and not save this indication locally.
So, with that out of the way, please download the app using the Download Materials button at the top or bottom of this tutorial.
Setting Up the Project
OK, so you have the starter project. Getting it to work will require you to make changes in both the project itself and on App Store Connect. Once you complete all of these steps, you’ll have a working app with a single auto-renewable subscription product.
- Create an App ID in the Apple Developer Portal. Be sure to use an Explicit App ID and make a note of the Bundle ID you use.
- Be sure you’ve accepted all legal agreements in App Store Connect, or you won’t see the right options in the following step. See Checking Your Agreements in the Getting Started tutorial if you need help.
- Create an iOS App in App Store Connect using said Bundle ID.
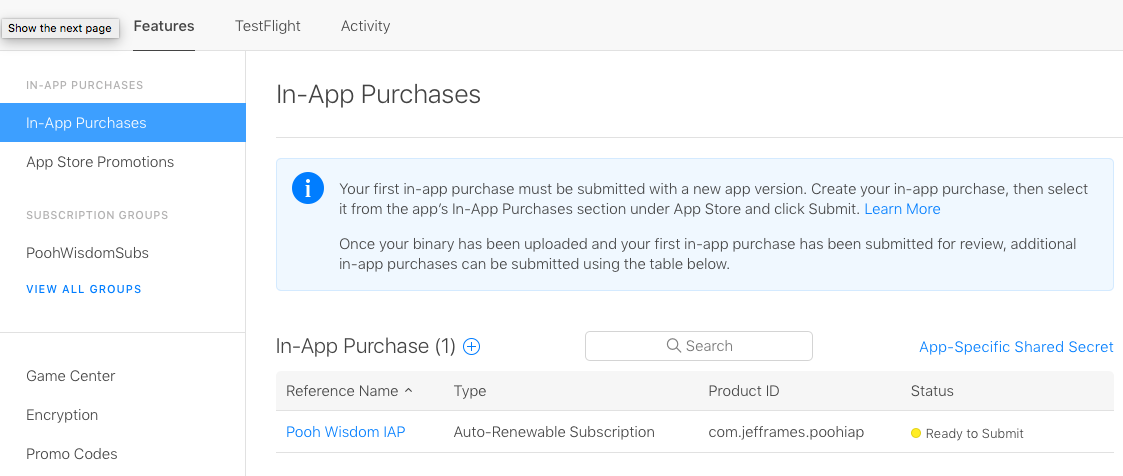
- Create an IAP Auto-Renewable Subscription product. Read below for some notes as you fill out the required fields.
In the process of creating an auto-renewable subscription, App Store Connect will ask you to define a subscription group. A subscription group is basically a collection of subscription products. You can learn more about subscription groups in the next section, but for now, just create a new subscription group for your new auto-renewable subscription. Call it PoohWisdomSubs.
Make sure you complete all of the meta-data for the newly created In-App Purchase, including the Review Information. You can use this image for the review screenshot.
Note the Subscription Duration field, which is specific to Renewable Subscriptions. This is the time duration after which the subscription will be automatically renewed unless the user opts out. In many cases, the only difference between the various IAP options your app offers will be the subscription duration and the price associated with it. The content itself won’t change — your users will be able to choose between multiple subscription options in order to get access to the same content.
Set the duration to 1 Month and the Subscription Price to $0.99 USD.
Select PoohWisdomSubs from the left navigation under SUBSCRIPTION GROUPS and add a localization.

Once you’re done, the status of your new In-App Purchase will show as Ready to Submit.

- Copy your App and Product IDs from the previous steps for easy access.
- The last thing you need to do before moving back to the project is to create a sandbox user for testing. Remember, you need to use a real email address — one that you actually have access to, so that you can verify the account.

OK, now time to start on the project! Just a few more steps and you’ll have a working initial app:
- Set the Bundle Identifier to the one you created.
- Switch the Team on the General tab to your developer team.
- Search for com.razeware.poohWisdom.monthlySub and replace it with the Product ID of the IAP you created.
Next, on the device you’ll be testing with, open the iOS Settings app and tap iTunes & App Store.
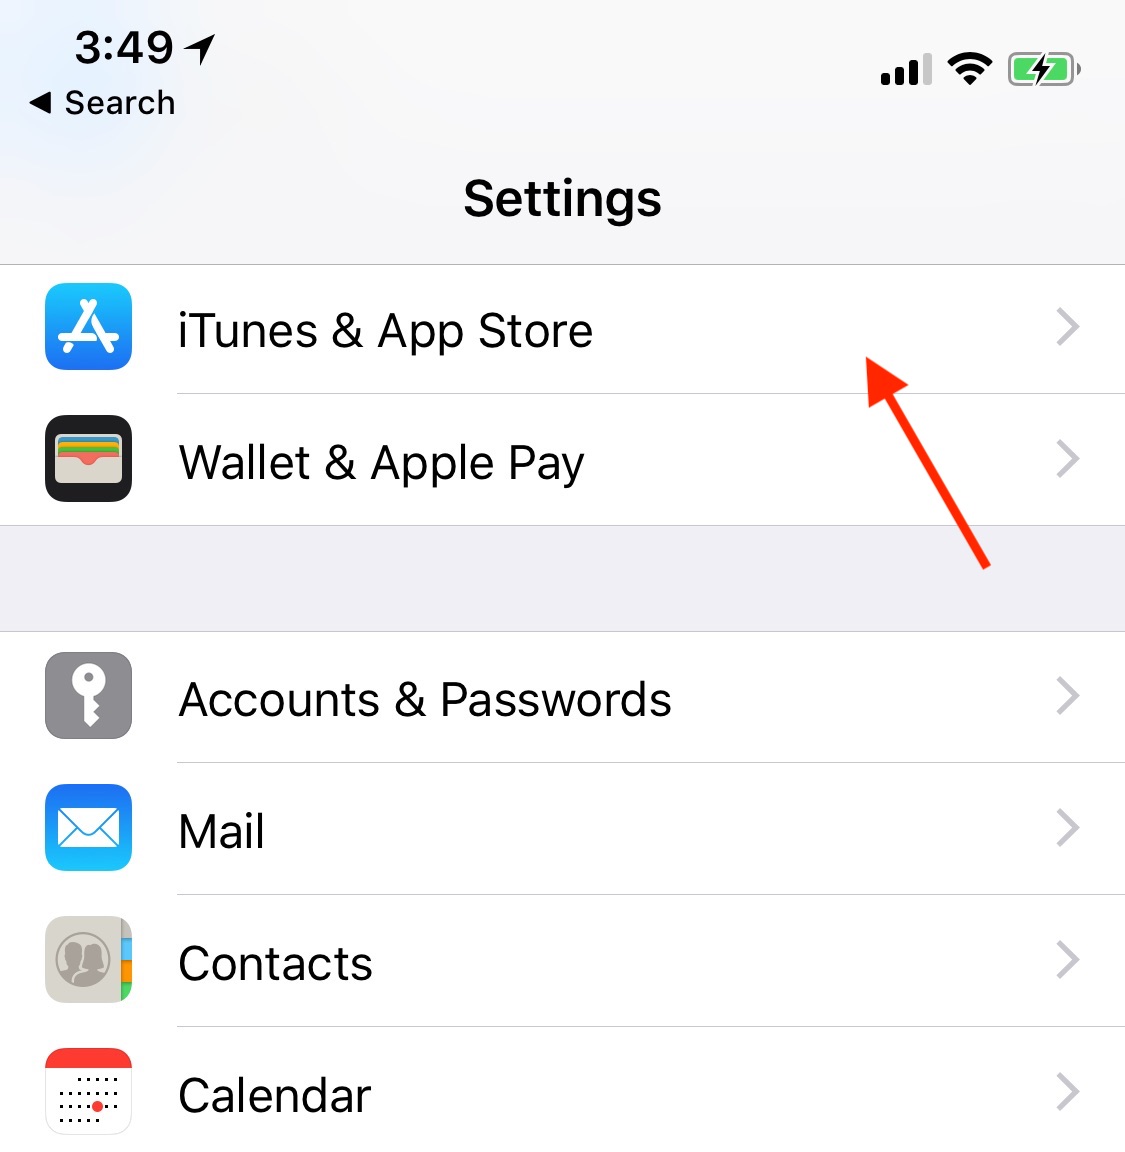
Tap your Apple ID and then tap Sign Out. At this point don’t actually sign in with the sandbox user. You’ll do this when you attempt to buy the IAP in your app.
Build and run the project, and you’ll see this in the project console:
Not purchased: $MyIAPID
Loaded list of products...
Found product: $MyIAPID $GroupID $Pricing
If you see this — congratulations! You have a working app with an auto-renewable IAP. But don’t get too comfy. You’re just getting started.
If you see something else, make sure you didn’t miss anything in the above steps:
- Did you set everything up on App Store Connect?
- Is your new IAP product status Ready to Submit?
- Did you set your Team and Bundle Identifier on your project’s General tab?
- Did you replace com.razeware.poohWisdom.monthlySub with your own product ID?
- Did you accept all of the agreements in App Store Connect, and do they all show as Active?
Tap Purchase.

Type in the username and password of the sandbox account you created on App Store Connect, tap Continue and then OK on the following popups. If all goes well, you should now see your very first Winnie the Pooh quote! I hope it’s a good one! :]
If you’re interested in learning more about StoreKit and everything that went on behind the scenes when you tapped the Purchase button, check out the great Getting Started tutorial (I promise this is the last time I’ll refer you to it).
OK, now that you got that out of the way, you’ll dive into auto-renewable subscription specifics, starting with subscription groups.
Subscription Groups
You encountered the concept of a subscription group when you were setting up your auto-renewable subscription on App Store Connect. As mentioned, this is basically a group of subscription products, but there’s a bit more to it than that.
You already know that each subscription must be a part of a subscription group. Users can select the subscription option that works best for them based on the price and duration of each.
What you may not know is that users can only buy one subscription within a group at a time. This is great if you want to prevent your users from accidentally purchasing multiple subscriptions that grant access to the same content. All you need to do to prevent this case is use a single subscription group for all relevant subscription products.
If you do want to offer multiple subscriptions at the same time, with each granting access to a different kind of content, you should use multiple subscription groups. Make sure that your users understand that they are actually subscribing to multiple services and don’t expect only a single active subscription. This may lead to frustrated users who cancel subscriptions and leave negative reviews, which in turn may prevent other users from subscribing, and nobody wants that. :]
To prevent these kinds of situations, make sure your subscription options are clear and easy to understand. The name of your subscription group is only visible to you, not to your users, so use it in a way that makes the most sense to you.
You can rank you subscriptions within each group. The ones that offer access to the most content, features or services, regardless of duration, should be at the top. You can have multiple subscriptions at each level if the offerings are equal. You set this up by dragging the subscriptions within the group. Drag one on top of the other to set them at the same level.

Users can choose to upgrade, crossgrade or downgrade their subscription in their account’s subscription page on the App Store:
- When a user upgrades, the transition takes effect immediately and they receive a refund of the prorated amount of their original subscription.
- When a user downgrades, the original subscription continues until the next renewal date and is then renewed at the lower level.
- When a user crossgrades, if the subscriptions are the same duration, the new subscription begins immediately. Otherwise, the new subscription goes into effect at the next renewal date.
Adding More Subscriptions
You’re now going to add another auto-renewable subscription to the app: yearly. Since the app only offers one type of content — life changing quotes by Winnie the Pooh — you’ll keep the new auto-renewable subscription at the same level as the existing subscription.
Go to App Store Connect and add another auto-renewable subscription product. When prompted to choose the subscription group for your new product, choose the same PoohWisdomSubs group you created earlier.

Set the subscription Duration field to 1 Year and fill out all of the other necessary information. Click Save and confirm the status is Ready to Submit. Copy the Product ID for your new auto-renewable subscription. You’ll need it shortly.
Now, go back to Xcode.
Open Main.storyboard and change the Purchase button title to Subscriptions, because you’re going to change the button to give the user a choice between the two available auto-renewable subscription options.
Go to ViewController.swift, locate displayRandomQuote() and delete this line of code:
purchaseBttn.isHidden = true
This will keep the subscriptions button visible after a successful purchase and allow your users to switch between subscriptions.
Now, locate purchaseSubscription(_:) and move the entire buyProduct closure to a new method called purchaseItemIndex(index: Int). Notice that the index parameter is never used. Change products[0] on the first line to products[index]. The new method should look like this:
PoohWisdomProducts.store.buyProduct(products[index]) { [weak self] success, productId in
  guard let self = self else { return }
  guard success else {
    let alertController = UIAlertController(title: "Failed to purchase product",
                                            message: "Check logs for details",
                                            preferredStyle: .alert)
    alertController.addAction(UIAlertAction(title: "OK", style: .default))
    self.present(alertController, animated: true, completion: nil)
    return
  }
  self.displayRandomQuote()
}
You can now use this new method to purchase the relevant subscription based on the user’s selection. You’ll select the subscription based on the value passed as products[index].
Back in purchaseSubscription(_:), you need to add the alert to let users select their preferred subscription option. Add the following below the guard:
let alertController = UIAlertController(
  title: "Choose your subscription",
  message: "Which subscription option works best for you",
  preferredStyle: .alert)

alertController.addAction(
  UIAlertAction(title: "Monthly",
                style: .default,
                handler: { action in
                  self.purchaseItemIndex(index: 0)})
)

alertController.addAction(
  UIAlertAction(title: "Yearly",
                style: .default,
                handler: { action in
                  self.purchaseItemIndex(index: 1)})
)

present(alertController, animated: true, completion: nil)
You just added an alert controller with two options: a monthly subscription and a yearly subscription. You’ll send a request to the app store to purchase the relevant subscription based on the user’s selection in this alert, identified by the index.
Now, all that’s left is to add the new product ID to the products array so the user will actually have two subscription options to choose from.
Go to PoohWisdomProducts.swift and change the name of poohWisdomSub to monthlySub. Then, add another product ID right below it. Name it yearlySub:
public static let monthlySub = "com.razeware.poohWisdom.monthlySub"
public static let yearlySub = "com.razeware.poohWisdom.yearlySub"
Make sure you replace the product IDs of both subscriptions with the ones you created on App Store Connect.
Change the initialization of the productIDs array to include the two subscription products:
private static let productIDs: Set<ProductID> =
  [PoohWisdomProducts.monthlySub, PoohWisdomProducts.yearlySub]}
Now, productIDs contains both available subscriptions and the app will request the relevant one from Apple’s server based on the user’s selection in the subscriptions alert.
Finally, go back to ViewController.swift and in viewDidLoad(), replace the condition checking if the user has purchased poohWisdomSub with one that checks either of the two available subscriptions. Your condition should now look like this:
if (PoohWisdomProducts.store.isProductPurchased(PoohWisdomProducts.monthlySub) ||
  PoohWisdomProducts.store.isProductPurchased(PoohWisdomProducts.yearlySub)){
  displayRandomQuote()
} else {
  displayPurchaseQuotes()
}
You’re now displaying a quote if the user has purchased either subscription.
Seeing it All Come Together
So, now that you have both subscriptions set up on both App Store Connect and the app itself, it’s time to test it. Using the same sandbox user, upgrade to the annual subscription by tapping Subscriptions and then choosing Yearly.

If you wanted to test purchasing the yearly subscription directly, you’d need to create a new sandbox user.
But before you go crazy with various testing scenarios (and I highly recommend that you do, because testing is incredibly important — especially edge-cases that may go unnoticed), there’s something you need to know about sandbox vs. production when it comes to auto-renewable subscriptions:
You don’t really want to test your auto-renewable over a period of days, months or years. So as long as you’re in the testing environment, renewals happen at an accelerated rate:

Also know that renewals are limited to six times per day. So, you may find yourself working with multiple test users if you want to test various scenarios.
Auto Renewable Subscriptions Best Practices
You now have a basic working app with multiple subscription options for your users to choose from. Now is a great time to cover a few auto-renewable subscriptions best practices:
- You already know that you shouldn’t hard code your product IDs in the app but fetch them from your server, instead. This will allow you more flexibility in which options you offer and when.
- You should never store other subscription data — such as prices, descriptions, etc — in your app. You should always rely on Apple for this up-to-date data. This will give you the ability to change prices and make unique promotional offerings without counting on users upgrading to a newer version.
- You should consider offering subscription management options within your app. This will give you the opportunity to create a subscription experience that’s tailor-made for your specific app. You can offer a branded, contextual experience for upgrading, crossgrading or even downgrading, while providing a deep link into Settings in case your users decide to cancel their subscription.
- Make sure you’re describing your subscription clearly so your users know exactly what they’re about to purchase. This will likely not only help you attract more subscribers but also help prevent frustrated users who paid for a subscription but expected to get something different.
- In addition to attracting new subscribers, you should also put some thought into keeping existing subscribers. One thing to consider is managing prices. There may come a time when you’ll be interested in increasing the price for one of your subscription options. This is OK for new users, but what about existing ones? You can decide to keep existing users at their old subscription price and only increase the price for new users, or you can decide to increase the price for everyone and hope for the best. If you do decide to increase the price for existing users, and have multiple groups of existing users at varying prices, make sure you first increase the price for users paying closest to the current price, then the next closest, and so on. Otherwise, your users may end up being prompted multiple times by Apple to accept increasingly higher prices.
- Most importantly, always be aware of Apple’s guidelines. This is relevant to everything you do on iOS but since this tutorial is about In-App Purchases, you should probably take a look at the relevant section in Apple’s guidelines and make sure everything makes sense to you there before starting to work on your next app.
Where to Go From Here?
You can download the final app using the Download Materials button at the top or bottom of this tutorial. Note that if you haven’t done so yet, you’ll need to go through the steps described in the Setting Up the Project section in order to get it to work.
You should now have a pretty good grasp of what you must do to set up auto-renewable subscriptions. If you’re interested in further reading, I highly recommend:
- Apple’s Auto-renewable Subscriptions page.
- Best Practices and What’s New with In-App Purchases session from WWDC 2018.
- Apple’s About Receipt Validation documentation for more details on how to validate your receipts.
- Our Introductory Pricing for iOS tutorial.
As you’re adding support for auto-renewable subscriptions to your app, always keep your users in mind. The best way to maximize your profits is to give your users something that they really need or want and to do so in a user-friendly way. That will keep them, and their money, coming back for more! :]
I hope you enjoyed this tutorial. Please use the forum below for any questions or comments!


Comments