How to Create a Simple FPS in Unreal Engine 4
In this Unreal Engine 4 tutorial, you will create a simple first-person shooter. You will learn how to create a first-person character that can fire a gun and how to damage other actors.

A first-person shooter (FPS) is a genre where the player uses guns and experiences the game through the eyes of the character. FPS games are immensely popular, as shown by franchises such as Call of Duty and Battlefield.
Unreal Engine was originally built to create FPS games so it only makes sense to create one using it. In this tutorial, you will learn how to:
- Create a first-person Pawn that can move and look around
- Create a gun and attach it to the player Pawn
- Shoot bullets using a line trace (also known as a ray cast)
- Apply damage to actors
- Part 1: Getting Started
- Part 2: Blueprints
- Part 3: Materials
- Part 4: UI
- Part 5: How to Create a Simple Game
- Part 6: Animation
- Part 7: Audio
- Part 8: Particle Systems
- Part 9: Artificial Intelligence
- Part 10: How to Create a Simple FPS (you are here!)
Getting Started
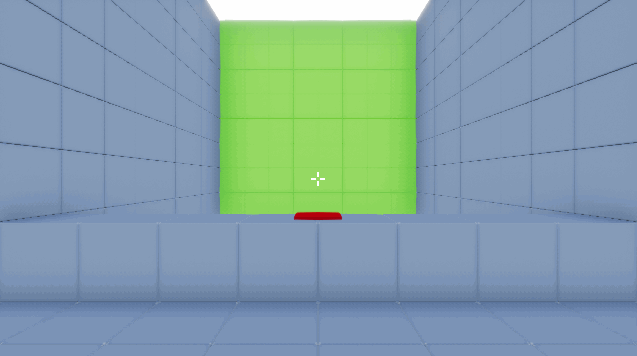
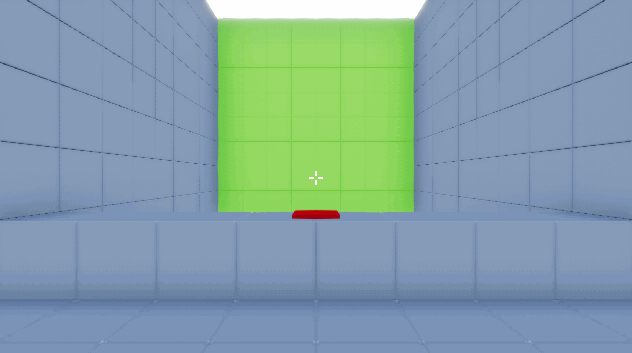
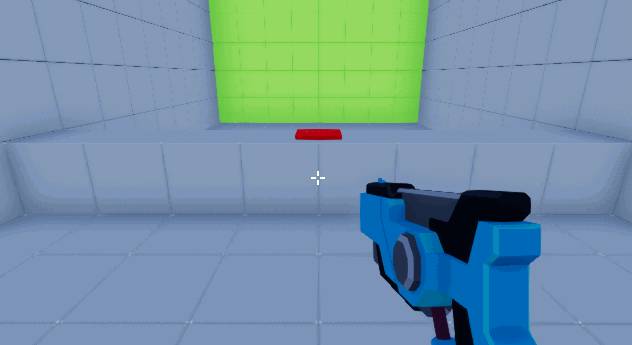
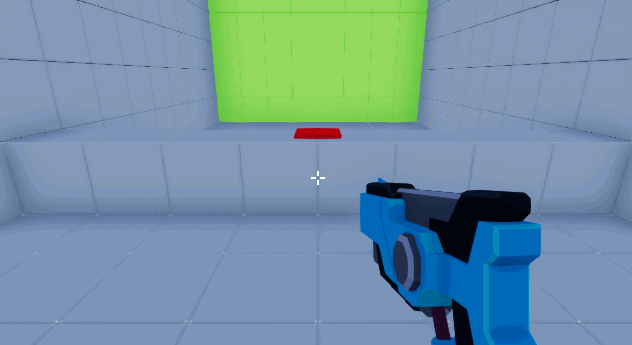
Download the starter project and unzip it. Navigate to the project folder and open BlockBreaker.uproject. You will see the following scene:

The green wall consists of multiple targets. When they take damage, they will turn red. Once their health reaches zero, they will disappear. The red button will reset all the targets.
First, you will create the player’s Pawn.
Creating the Player Pawn
Navigate to the Blueprints folder and create a new Blueprint Class. Select Character as the parent class and name it BP_Player.

Character is a type of Pawn but with additional functionality such as the CharacterMovement component.

This component automatically handles movement such as walking and jumping. You simply call the appropriate function and it will move the Pawn. You can also set variables such as walk speed and jump velocity within this component.
Before you can make the Pawn move, it needs to know when the player presses a movement key. To do this, you will map movement to the W, A, S and D keys.
Creating Movement Mappings
Select Edit\Project Settings and open the Input settings.
Create two Axis Mappings called MoveForward and MoveRight. MoveForward will handle moving forwards and backwards. MoveRight will handle moving left and right.

For MoveForward, change the key to W. Afterwards, create another key and set it to S. Change the Scale for S to -1.0.

Later on, you will multiply the scale value with the Pawn’s forward vector. This will give you a vector that points forward if the scale is positive. If the scale is negative, the vector will point backwards. By using the resulting vector, you can make your Pawn move forwards and backwards.
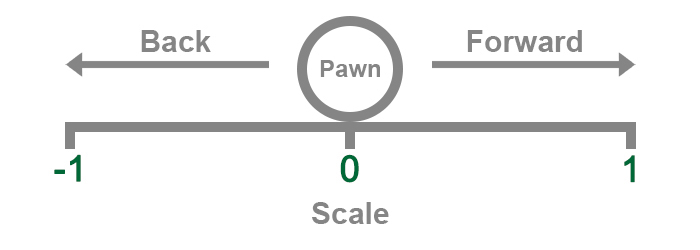
Next, you need to do the same for moving left and right. Change the key for MoveRight to D. Afterwards, create a new key and set it to A. Change the Scale for A to -1.0.

Now that you have the mappings set up, you need to use them to move.
Implementing Movement
Open BP_Player and open the Event Graph. Add a MoveForward (the one listed under Axis Events) event. This event will execute every frame, even if you don’t press anything.

It will also output an Axis Value which will be the Scale values you set earlier. It will output 1 if you press W and -1 if you press S. If you don’t press either key, it will output 0.
Next, you need to tell the Pawn to move. Add an Add Movement Input and connect it like so:

Add Movement Input will take a vector and multiply it by Scale Value. This will convert it to the appropriate direction. Since you are using Character, the CharacterMovement component will move the Pawn in that direction.
Now, you need to specify which direction to move in. Since you want to move forward, you can use Get Actor Forward Vector. This will return a vector pointing forwards. Create one and connect it like so:

Summary:
- MoveForward will run every frame and output an Axis Value. This value will be 1 if you press W and -1 if you press S. If you don’t press either key, it will be 0.
- Add Movement Input will multiply the Pawn’s forward vector with Scale Value. This will cause the vector to point forwards or backwards depending on which key you press. If you don’t press any key, the vector will not have a direction, meaning the Pawn will not move.
- CharacterMovement component will get the result from Add Movement Input. It will then move the Pawn in that direction.
Repeat the process for MoveRight but replace Get Actor Forward Vector with Get Actor Right Vector.

Before you can test the movement, you need to set the default pawn in the game mode.
Setting the Default Pawn
Click Compile and then go back to the main editor. Open the World Settings panel and locate the Game Mode section. Change Default Pawn Class to BP_Player.

Now you will automatically use BP_Player when the game starts. Press Play and use the W, A, S and D keys to move around.
Next, you will create mappings for looking around.
Creating Look Mappings
Open the Project Settings. Create two more Axis Mappings called LookHorizontal and LookVertical.

Change the key for LookHorizontal to Mouse X.

This mapping will output a positive value when you move the mouse right and vice versa.
Next, change the key for LookVertical to Mouse Y.

This mapping will output a positive value when you move the mouse up and vice versa.
Now, you need to create the logic for looking around.
Implementing Looking
If a Pawn does not have a Camera component, Unreal will automatically create a camera for you. By default, this camera will use the rotation of the controller.
Even though controllers are non-physical, they still have their own rotation. This means you can make the Pawn and camera face different directions. For example, in a third-person game, the character and camera do not always face the same direction.
To rotate the camera in a first-person game, all you need to do is change the rotation of the controller.
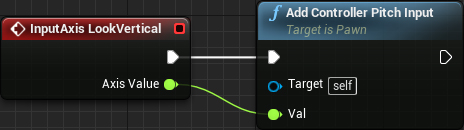
Open BP_Player and then create a LookHorizontal event.

To make the camera look left or right, you need to adjust the controller’s yaw. Create an Add Controller Yaw Input and connect it like so:

Now, when you move the mouse horizontally, the controller will yaw left or right. Since the camera is using the controller’s rotation, it will also yaw.
Repeat the process for LookVertical but replace Add Controller Yaw Input with Add Controller Pitch Input.
If you use test the game right now, you’ll notice that vertical looking is inverted. This means when you move the mouse up, the camera will look down.
If you prefer non-inverted controls, multiply Axis Value by -1. This will invert Axis Value which will invert the controller pitching.

Click Compile and then press Play. Use your mouse to start looking around.
Now that all the movement and looking is done, it’s time to create the gun!
Creating the Gun
You know how when you create a Blueprint Class, you can select a parent class? Well, you can also select your own Blueprints as the parent too. This is useful when you have different types of objects that share common functionality or attributes.
Let’s say you want to have multiple types of cars. You can create a base car class that contains variables such as speed and color. You can then create classes (the children) that use the base car class as the parent. Each child will also contain the same variables. Now you have an easy way to create cars with different speed and color values.
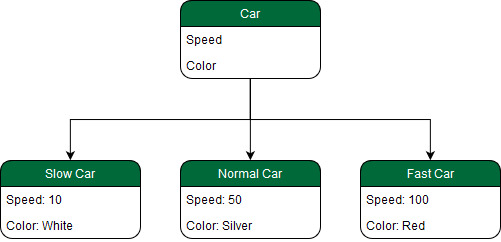
You can use the same method to creating guns. To do this, you need to create a base class first.
Creating the Base Gun Class
Go back to the main editor and create a Blueprint Class of type Actor. Name it BP_BaseGun and then open it.
Next, you will create a few variables that will define some properties of the gun. Create the following float variables:
- MaxBulletDistance: How far each bullet can travel
- Damage: How much damage to apply when a bullet hits an actor
- FireRate: How long (in seconds) before the gun can shoot another bullet

Now, you need a physical representation of the gun. Add a Static Mesh component and name it GunMesh.

Don’t worry about selecting a static mesh for now. You will do this in the next section when you create a child gun class.
Creating a Child Gun Class
Click Compile and then go back to the main editor. To create a child class, right-click on BP_BaseGun and select Create Child Blueprint Class.

Name it BP_Rifle and then open it. Open the Class Defaults and set each variable to the following values:
- MaxBulletDistance: 5000
- Damage: 2
- FireRate: 0.1

This means each bullet can travel a maximum distance of 5000. If it hits an actor, it will deal 2 damage. When firing consecutive shots, the duration between each shot will be at least 0.1 seconds.
Next, you need to specify which mesh the gun should use. Select the GunMesh component and set its Static Mesh to SM_Rifle.

The gun is now complete. Click Compile and then close BP_Rifle.
Next, you will create your own camera component. This will give you better control of camera placement. It will also allow you to attach the gun to the camera which will keep the gun in front of the camera.
Creating the Camera
Open BP_Player and then create a Camera component. Name it FpsCamera.

The default position is a bit too low which might make the player feel small. Set the location of FpsCamera to (0, 0, 90).

By default, Camera components don’t use the controller’s rotation. To fix this, go to the Details panel and enable Camera Settings\Use Pawn Control Rotation.

Next, you need to define where the gun should be located.
Defining the Gun Location
To create the gun location, you can use a Scene component. These components are perfect for defining locations because they only contain a Transform. Make sure you have FpsCamera selected and then create a Scene component. This will attach it to the camera. Name it GunLocation.

By attaching GunLocation to FpsCamera, the gun will maintain the same position relative to the camera. This is how you always keep the gun in front of the camera.
Next, set the location of GunLocation to (30, 14, -12). This will place it to the front and slighly to the side of the camera.

Afterwards, set the rotation to (0, 0, -95). When you attach the gun, this will make it appear as though it is aiming towards the center of the screen.

Now, you need to spawn the gun and attach it to GunLocation.
Spawning and Attaching the Gun
Locate Event BeginPlay and create a Spawn Actor From Class. Set Class to BP_Rifle.

Since you will need to use the gun later, you should store it in a variable. Create a variable of type BP_BaseGun and name it EquippedGun.
By making the variable of type BP_BaseGun, you are creating a big hole that can accept many shapes.
Next, set EquippedGun to the Return Value of Spawn Actor From Class.

To attach the gun, you can use an AttachToComponent. Create one and set Location Rule and Rotation Rule to Snap to Target. This will make the gun have the same location and rotation as its parent.

Next, create a reference to GunLocation and connect everything like so:

Summary:
- When BP_Player spawns, it will spawn an instance of BP_Rifle
- EquippedGun will keep a reference to the spawned BP_Rifle for later use
- AttachToComponent will attach the gun to GunLocation
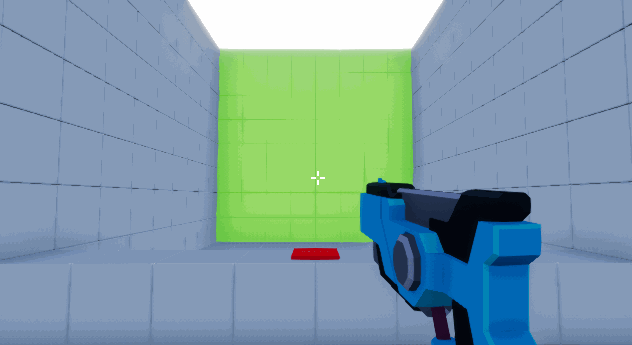
Click Compile and then press Play. Now you will have a gun when you spawn! When you look around, the gun will always be in front of the camera.
Now comes the fun part: shooting bullets! To check if a bullet hits something, you can use a line trace.
Shooting Bullets
A line trace is a function that takes in a start and end point (which form a line). It will then check each point along the line (from start to end) until it hits something. In games, this is the most common method to check if a bullet hits something.
Since shooting is a function of guns, it should go in the gun class rather than the player. Open BP_BaseGun and create a function called Shoot.
Afterwards, create two Vector inputs and name them StartLocation and EndLocation. These will be the start and end points of the line trace (which you will pass in from BP_Player).

You can perform a line trace using a LineTraceByChannel. This node will check for hits using the Visibility or Camera collision channel. Create one and connect it like so:

Next, you need to check if the line trace hit anything. Create a Branch and connect it like so:

Return Value will output true if there was a hit and vice versa.
To give the player some visual feedback on where the bullet hit, you can use a particle effect.
Spawning Bullet Impact Particles
First, you need to get the location of the trace hit. Drag-click on Out Hit and release left-click in the graph. From the menu, select Break Hit Result.

This will give you a node with various pins relating to the result of the line trace.
Create a Spawn Emitter at Location and set Emitter Template to PS_BulletImpact. Afterwards, connect its Location to Location of Break Hit Result.

Here is the function so far:

Summary:
- When Shoot executes, it will perform a line trace using the provided start and end points
- If there was a hit, Spawn Emitter at Location will spawn PS_BulletImpact at the hit location
Now that the shooting logic is complete, you need to use it.
Calling the Shoot Function
First, you need to create a key mapping for shooting. Click Compile and then open the Project Settings. Create a new Axis Mapping called Shoot. Set its key to Left Mouse Button and then close the Project Settings.

Afterwards, open BP_Player and create a Shoot event.

To check if the player is pressing the Shoot key, you just need to check if Axis Value equals 1. Create the highlighted nodes:
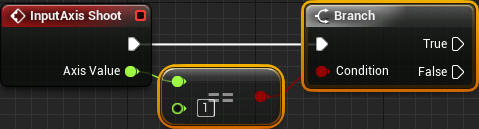
Next, create a reference to EquippedGun and then call its Shoot function.

Now you need to calculate the start and end points for the line trace.
Calculating the Line Trace Locations
In many FPS games, the bullet starts from the camera rather than the gun. This is because the camera is already perfectly aligned with the crosshair. So if you shoot from the camera, the bullet is guaranteed to go where the crosshair is.
Create a reference to FpsCamera and then connect it to a GetWorldLocation.

Now you need the end location. Remember that the guns have a MaxBulletDistance variable. This means the end location needs to be MaxBulletDistance amount of units in front of the camera. To do this, create the highlighted nodes:

Afterwards, connect everything like so:

Summary:
- When the player presses or holds left-click, the gun will shoot a bullet starting from the camera
- The bullet will travel forward by the distance specified by MaxBulletDistance
Click Compile and then press Play. Hold left-click to start shooting.
Currently, the gun is shooting every frame. That’s a bit too fast so the next step is to decrease the gun’s fire rate.
Decreasing the Fire Rate
First, you need a variable to decide if the player can shoot. Open BP_Player and create a boolean variable named CanShoot. Set its default value to true. If CanShoot equals true, the player can shoot and vice versa.
Change the Branch section to the following:

Now, the player can only shoot if the Shoot key is being pressed and CanShoot equals true.
Next, add the highlighted nodes:

Changes:
- The player can only shoot if holding left-click and CanShoot equals true
- Once the player shoots a bullet, CanShoot will be set to false. This will prevent the player from shooting again.
- CanShoot will be set back to true after the duration provided by FireRate
Click Compile and then close BP_Player. Press Play and test out the new fire rate.
Next, you will make the targets and button respond to bullets. You can do this by applying damage to them.
Applying Damage
In Unreal, every actor has the ability to receive damage. However, it is up to you to decide how the actor responds to it.
For example, when receiving damage, a fighting game character would lose health. However, something like a balloon would not have health. Instead, you would program the balloon to pop when it receives damage.
Before you handle how the actor receives damage, you first need to apply damage. Open BP_BaseGun and add an Apply Damage at the end of the Shoot function.

Next, you need to specify which actor you want to damage. In this case, it is the actor hit by the line trace. Connect Damaged Actor to Hit Actor of the Break Hit Result.

Finally, you need to specify how much damage to apply. Get a reference to Damage and connect it to Base Damage.

Now, when you call Shoot, it will damage any actors hit by the line trace. Click Compile and then close BP_BaseGun.
Now you need to handle how each actor receives damage.
Handling Damage
First, you will handle how the targets take damage. Open BP_Target and then create an Event AnyDamage. This event will execute whenever the actor receives damage that is not zero.

Afterwards, call the TakeDamage function and connect the Damage pins. This will subtract health from the target’s Health variable and update the target’s color

Now, when the target takes damage, it will lose health. Click Compile and then close BP_Target.
Next, you need to handle how the button takes damage. Open BP_ResetButton and create an Event AnyDamage. Afterwards, call the ResetTargets function.

This will reset all of the targets when the button receives damage. Click Compile and then close BP_ResetButton.
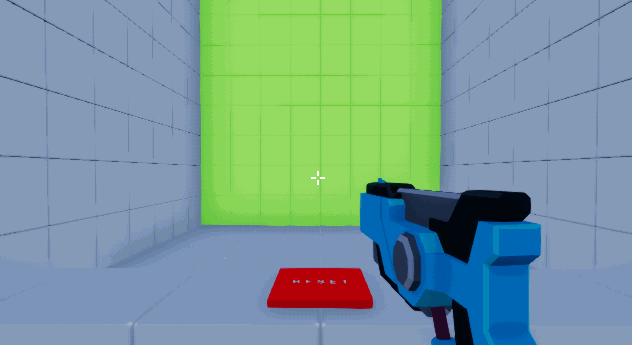
Press Play and start shooting the targets. If you want to reset the targets, shoot the button.
Where to Go From Here?
You can download the completed project here.
Even though the FPS you created in this tutorial is simple, you can use easily extend it. Try creating more guns with different types of fire rate and damage. Maybe try adding reload functionality too!
That’s it for our Unreal Engine for Beginners tutorial series. But don’t worry – we’re hoping to make many more tutorials in the months ahead.
And that’s where you come in! Tomorrow, we’re going to start recruiting for our new Unreal Engine tutorial team, to help create more great Unreal Engine tutorials like this series for the community. I hope to see some of you apply! :]


Comments