Unreal Engine 4 Particle Systems Tutorial
In this Unreal Engine 4 tutorial, you will learn how to create particle systems and update them using Blueprints.


Particle systems are a key component to visual effects. They allow artists to easily create effects such as explosions, smoke and rain.
Unreal Engine 4 has a robust and easy-to-use system to create particle effects called Cascade. This system allows you to create modular effects and easily control particle behaviour.
In this tutorial, you will learn how to:
- Create a particle system
- Set the velocity and size of a particle
- Adjust the particle spawn rate
- Scale the particle’s size over its lifetime using curves
- Set the particle color using Cascade
- Activate and deactivate a particle system using Blueprints
- Set particle colors using Blueprints
Getting Started
Download the starter project and unzip it. Navigate to the project folder and open SpaceshipBattle.uproject.
Press Play to start the game. Hold left-click to shoot and use W, A, S and D to move around.

In this tutorial, you will create two particle effects. One for the ship’s thrusters and one for when a ship explodes. To create these, you will use particle systems.
What is a Particle System?
As its name suggests, a particle system is a system to create and manage particles. A particle is basically a point in space. Using particle systems, you can control the appearance and behaviour of the particle.
Particle systems consist of one or more components called emitters. These are responsible for spawning particles.

Emitters also have components called modules. Modules control specific properties of the particles spawned by the emitter. For example, the material and initial velocity of a particle. In the example below, two modules are used to give each particle a red circle material and random velocity.

You can also change a particle’s color over its lifetime. In this example, the particle’s color changes from red to blue:

Now that you know what a particle system is, it’s time to create one for the ship’s thrusters.
Creating a Particle System
Navigate to the ParticleSystems folder and click Add New\Particle System. Rename the particle system to PS_Thruster and then open it.
Cascade: The Particle System Editor
Cascade is composed of four main panels:
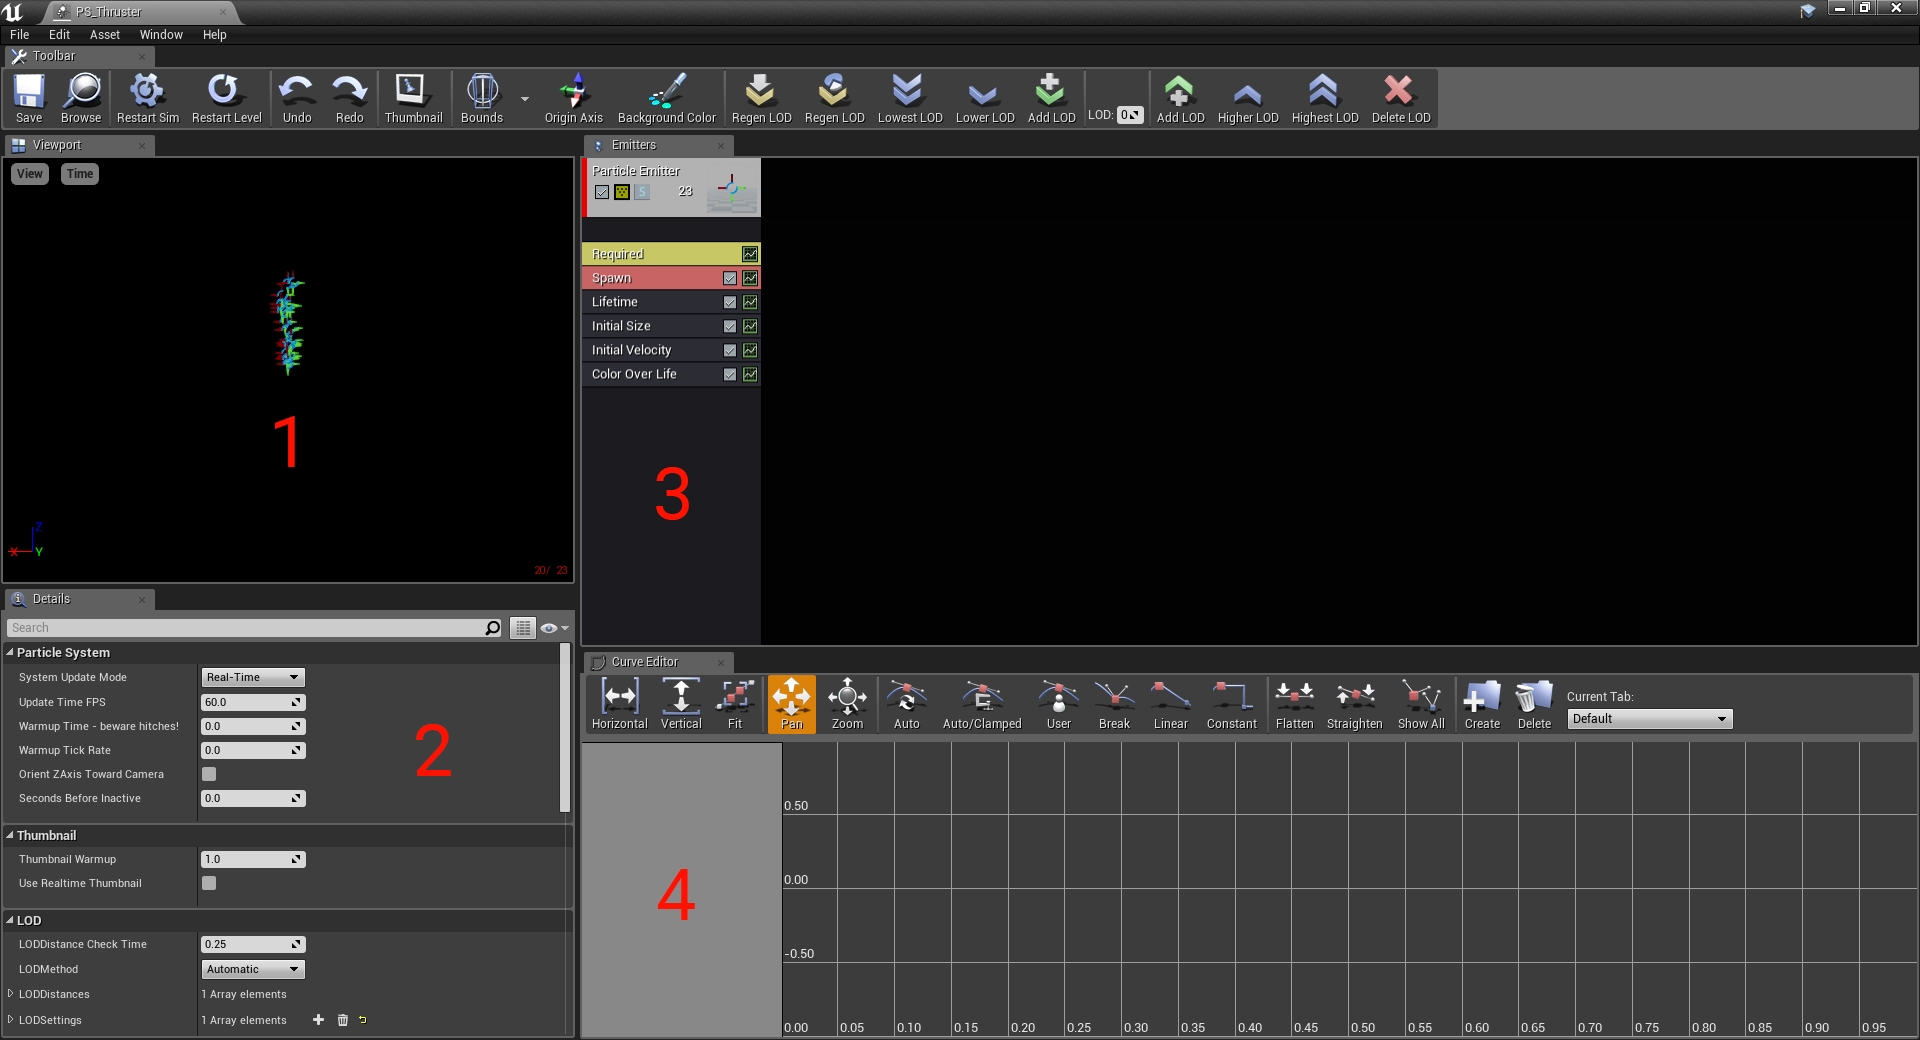
- Viewport: This panel will display a preview of your particle system. You can look around by holding right-click and moving your mouse. To move, hold right-click and use the WASD keys.
- Details: Any component (emitters, modules etc.) you select will have its properties displayed here. If nothing is selected, it will display the properties for the particle system.
- Emitters: This panel will show a list of emitters from left to right. Each emitter displays a list of its modules.
- Curve Editor: The Curve Editor allows you to visualize and adjust the values of a module’s curves. Not all module properties support curves.
Right now, the particle system is using the default particle material.

To start, you will replace the particle material with a circle material.
Applying a Material to Particles
Go to the Emitters panel and select the Required module.

The Required module contains necessary properties such as particle material and emitter duration. Every emitter must have a Required module.
To change the material, go to the Details panel and set Material to M_Particle. This will change the particle’s appearance to an orange circle.

Next, you will attach the particle system to the player’s ship.
Attaching the Particle System
Go back to the main editor and navigate to the Blueprints folder. Open BP_Player and then go to the Components panel.
To use a particle system, you can use a Particle System component. Create one and rename it to ThrusterParticles. Make sure you attach it to the Collision component.

To specify a particle system, go to the Details panel and locate the Particles section. Set Template to PS_Thruster.
Next, set the Location of ThrusterParticles to (-80, 0, 0). This will place it behind the ship.

Finally, set the Rotation to (0, 90, 0). This will orient the particle system so that the particles move away from the ship.

Click Compile and then go back to the main editor. Press Play to see the particle system in effect.

The particle system is working but the particles move a bit too slowly and are very small. You can fix this by setting the particle’s initial velocity and size.
Setting a Particle’s Velocity and Size
First, you will set the initial velocity of the particles. Open PS_Thruster and then select the Initial Velocity module. Afterwards, expand Start Velocity\Distribution.
By default, a particle’s initial velocity will range from (-10, -10, 50) to (10, 10, 100).

To move the particles away from the ship at a faster speed, all you need to do is increase the Z velocity. Set Min Z to 300 and Max Z to 400.

Here is a comparison between the original and new velocities:

Next, you will set the initial size of the particles.
Setting the Particle’s Size
Select the Initial Size module and then go to the Details panel. Afterwards, expand Start Size\Distribution.
Like the Initial Velocity module, Initial Size also has a minimum and maximum range. However, for this tutorial, you will set the size to be a constant value. To do this, set Distribution to Distribution Vector Constant.

Afterwards, set Constant to (70, 70, 70). Here is a size comparison:

Go back to the main editor and press Play.

The particles are looking better but they’re still spaced quite far apart. This is because the duration between particle spawning is too large. To fix this, you can increase the spawn rate.
Increasing the Particle Spawn Rate
To increase the spawn rate, you need to use the Spawn module. This module controls how fast the emitter will spawn particles. Along with Required, every emitter must have a Spawn module.
Open PS_Thruster and then select Spawn. Go to the Details panel and then expand the Spawn\Rate section.

Set Constant to 50. This will increase the spawn rate to 50 particles per second.

Go back to the main editor and press Play.

As you can see, it now looks more like a trail. To make the particles look more like thruster flames, you can shrink them over time.
Shrinking the Particles Over Time
Open PS_Thruster and then go to the Emitters panel.
To shrink the particles, you can use a Size By Life module. This module will apply a multiplier to the particle’s size over its lifetime. Create one by right-clicking an empty space in the emitter and selecting Size\Size By Life.

By default, this will have no visual effect on the particle’s size. This is because the multiplier is always set to 1. To shrink the particle, you need to adjust the module’s curve so that the size multiplier decreases over time. But first, what is a curve?
What is a Curve?
A curve is a collection of points. Each point has two things: a position and a value.
When you have two or more points, you form a line. Below is an example of a basic linear curve. Point A has a position and value of 0. Point B has a position of 2 and value of 1.

If you sample a linear curve at any position, it functions like a linear interpolation. For example, if you sampled the curve above at position 1, you would receive a value of 0.5.

If you create a curve that declines, the value you receive will gradually get smaller. This is the type of curve you want to use for the Size By Life module.

Now, you will create the curve above within Cascade.
Modifying a Module’s Curve
Select Size By Life and then go to the Details panel. Afterwards, expand Life Multiplier\Distribution\Constant Curve\Points. Here, you will see a list of points for the Life Multiplier curve.

In Val is the point’s position on the curve. For Size By Life, a value of 0 indicates the beginning of a particle’s life. A value of 1 indicates the end of a particle’s life.
To decrease the size multiplier over time, you need to decrease the Out Val of the second point. Set Out Val of point 1 to (0, 0, 0). This will decrease the particle’s size towards 0 over time.

You can visualize the Life Multiplier curve using the Curve Editor. To do this, click the graph icon on the Size By Life module.

This will add Life Multiplier to the Curve Editor. To fit the curve into view, click Fit in the Curve Editor.

As you can see, the size multiplier decreases from 1 to 0 over the particle’s lifetime.

Go back to the main editor and press Play

The particles now look more like flames! The final thing you will add to this particle system is color variation.
Adding Color Variations
To set a particle’s color using Cascade, you need to set up the particle material correctly. Navigate to the Materials folder and open M_Particle.

Currently, the color is set in the material. To use a color from the particle system, you need to use a ParticleColor node.
First, delete the node connected to Emissive Color. Next, add a ParticleColor node and connect it like so:

[spoiler title=”Optional”]
If you would like to control the particle’s opacity as well, add a Multiply and connect it like so:

[/spoiler]
Click Apply and then close M_Particle.
To set the particle’s color, you can use the Initial Color module.
The Initial Color Module
Open PS_Thruster and then add an Initial Color module. You can find it under the Color category.

To add color variations, you need to specify a range the color can be in. To do this, you can use distributions.
Select Initial Color and then go to the Details panel. Expand the Start Color section and change Distribution to Distribution Vector Uniform. This will allow you to specify a range for each color channel.

For this tutorial, the color should range from orange to red. To do this, set Max to (1.0, 0.0, 0.0) and Min to (1.0, 0.35, 0.0).

If you look at the Viewport, you’ll notice the color behaving strangely.

This is because the Color Over Life module is constantly updating the color to white. To fix this, select Color Over Life and press Delete. Your module list should now look like this:

Close PS_Thruster and then press Play in the main editor. Look at those thruster flames!

Next, you will learn how to toggle the particle system, depending on if the ship is moving.
Toggling the Particle System
To check if the ship is moving, you can check if the player is pressing any movement keys.
Open BP_Player and locate the Event Tick node. Add the following set up to the end of the node chain:

Let’s run through what this set up does:
- This checks the MoveUp and MoveRight axis mappings. If both return 0, that means the player isn’t pressing any movement keys.
- If Branch returns true (player isn’t pressing any movement keys), deactivate ThrusterParticles
- If Branch returns false (player is pressing a movement key), activate ThrusterParticles
Click Compile and then close BP_Player. Press Play and switch between moving and not moving to see the toggle.

Now it’s time for the fun part: creating an explosion particle system!
Creating an Explosion Effect
Instead of creating a new particle system, you will duplicate the thruster particles. Navigate to the ParticleSystems folder, right-click on PS_Thruster and select Duplicate. Rename it to PS_Explosion and then open it.
For an explosion, all the particles should spawn at the same time instead of one by one. This is known as burst-emitting.

Creating a Burst
First, you will need to set the spawn rate to zero because you don’t want to use the default spawning behaviour. Select the Spawn module and set Spawn\Rate\Distribution\Constant to 0.

Next, you need to tell the emitter you want to create a burst. Scroll down to the Burst section and add a new entry to the Burst List. You can do this by clicking the + icon.

Each entry will contain three fields:
- Count: How many particles to spawn. Set this to 20.
- Count Low: If greater than or equal to 0, the amount of particles spawned will range from Count Low to Count. Leave this at -1.
- Time: When to spawn the particles. A value of 0 indicates the beginning of the emitter’s lifetime. A value of 1 indicates the end of the emitter’s lifetime. Leave this at 0.0.

This means the emitter will spawn 20 particles at the beginning of its life.

To make it look like an explosion, you need to set the velocity so that the particles move outwards.
Moving the Particles Outwards
Since this is a top-down game, you only need to specify the X and Y velocities. Select the Initial Velocity module and expand Start Velocity\Distribution. Set Max to (1000, 1000, 0) and Min to (-1000, -1000, 0).

By specifying a range that goes from negative to positive, the particles will move outwards from the emitter.

Next, you need to set the amount of times the emitter should loop.
Setting the Emitter Loops
By default, emitters will loop indefinitely. This is great for effects such as fire and smoke but a burst should only play once. To fix this, you need to tell the emitter to only loop once.
Select the Required module and then locate the Duration section. Set Emitter Loops to 1.

Now, it’s time to play the explosion when an enemy dies!
Spawning Particles on Enemy Death
Go back to the main editor and navigate to the Blueprints folder. Open BP_Enemy and then locate the OnDeath event.
To spawn a particle system, you can use a Spawn Emitter at Location node. Create one and connect it to Destroy Actor.

Next, set Emitter Template to PS_Explosion.

Finally, create a GetActorLocation and connect it to the Location pin.

Now, when an enemy dies, it will spawn an instance of PS_Explosion at the enemy’s location.
Click Compile and then go back to the main editor. Press Play and start shooting some baddies.

Look at all those explosions! Next, you’ll add some extra spice to them by making them the same color as the enemy.
Changing the Explosion Color to Enemy Color
To use the enemy’s color, you need a way to receive that information from Blueprints. Luckily, Cascade has a distribution type that allows for this.
Open PS_Explosion and select the Initial Color module. Set Start Color\Distribution to Distribution Vector Particle Parameter.

This will give you a parameter that you can set using Blueprints. Set the Parameter Name to PrimaryColor

For the explosion, you will use both of the enemy’s colors. To use the second color, you will need another emitter. Right-click an empty space on the emitter and select Emitter\Duplicate and Share Emitter. This will duplicate the emitter.

You’ll notice that each module now has a + sign next to it. By using Duplicate and Share Emitter instead of Duplicate, you have linked the modules instead of copying them. Any changes you make in one module will also happen in the same module of the other emitter. This is useful if you want to change properties across all emitters such as size.
The only module you will need to change is Initial Color. However, if you make a change, both emitters will receive the change. In this case, you do not want the modules to be linked as they need individual parameter names. The easiest way to unlink them is to delete the duplicated Initial Color module and create a new one.

Select the new Initial Color and set Start Color\Distribution to Distribution Vector Particle Parameter. Next, set Parameter Name to SecondaryColor.

At this point, the particle system is complete. Close PS_Explosion.
Next, you need to set the parameters using Blueprints.
Setting Particle Parameters Using Blueprints
Open BP_Enemy and then add the highlighted nodes after Spawn Emitter at Location:

This will allow you to set two parameters within PS_Explosion.
Now, you need to set the correct parameter names. Set Parameter Name for the first Set Color Parameter to PrimaryColor. Set Parameter Name for the second Set Color Parameter to SecondaryColor

Finally, you need to provide the colors. To make things easier, the colors have already been stored in the variables PrimaryColor and SecondaryColor. Connect each variable to their respective nodes like so:

Here is what you should end up with:

Let’s go over the order of events:
- When an enemy dies, it will spawn an instance of PS_Explosion at its location
- The PrimaryColor parameter of PS_Explosion will be set
- The SecondaryColor parameter of PS_Explosion will be set
Click Compile and then close BP_Enemy. Press Play and start shooting enemies to see the particle mayhem!

Look at all those juicy particles. See if you can add an explosion when the player dies!
[spoiler]
- Open BP_Player and locate the OnDeath event
- Add a Spawn Emitter at Location node to the Then 1 pin of Sequence. Set Emitter Template to PS_Explosion.
- Create a GetActorLocation and connect it to the Location pin of Spawn Emitter at Location
- Create a Set Color Parameter and connect it to Spawn Emitter at Location. Set Parameter Name to PrimaryColor and connect the PrimaryColor variable to Param.
- Create another Set Color Parameter and connect it to the first Set Color Parameter. Set Parameter Name to SecondaryColor and connect the SecondaryColor variable to Param.

[/spoiler]
Where to Go From Here?
You can download the completed project here.
Would you believe that you’ve barely scratched the surface of Cascade? You’ve created some neat effects but there are still a lot more modules for you to try out. I would recommend learning more about TypeData modules. Using them, you can create effects such as trails for sword slashes, lightning and even raining cows!
If you want to keep learning, check out the next post in the series, where I’ll show you how to get started with Artificial Intelligence.


Comments