Unreal Engine 4 Audio Tutorial
In this Unreal Engine 4 audio tutorial, you will learn how to play audio in 3D space using different methods, and control audio volumes through a UI.


In video games, the term audio is used to refer to things such as music, dialogue and sound effects. In this era of gaming, if your project does not have audio, it can seem unpolished and incomplete.
Audio also helps increase the immersion between the player and the game. Music provokes an emotional response. Dialogue develops characters and the story. Sound effects provide feedback and believability. All of these can turn a good game into a great game.
In this tutorial, you will learn how to:
- Play music and loop it
- Play a sound effect at specific points in an animation
- Modulate the pitch of a sound every time it plays
- Pan and adjust the volume of a sound depending on its location in 3D space
- Control the volume of music and sound effects independently using the UI
Please note, you will be using Blueprints in this tutorial. If you haven’t already, please go through the previous tutorials as they cover different areas of Blueprints.
It is also recommended to use headphones for this tutorial as you will learn how to spatialize audio.
Getting Started
Download the starter project and unzip it. Open the project by navigating to the project folder and opening SkywardMuffin.uproject.
Press Play to start the game. The goal of the game is to touch as many clouds as possible without falling. Click the left-mouse button to jump up to the first cloud.

The game is relaxing, isn’t it? To emphasize the feeling of relaxation, the first thing you will do is play some calm piano music.
Playing Music
Go to the Content Browser and navigate to the Audio folder. Here, you will find all the sounds you will use in this tutorial. You can listen to them by hovering over their icon and then clicking the play icon that appears.

Playing music is as simple as dragging and dropping the sound asset into the Viewport. However, the music will only play once. This is because you need to manually enable looping within the asset. Double-click on S_Music to open it.

A new window with a single Details panel will appear. Go to the Sound Wave section and enable Looping.

Next, go back to the main editor and then drag-click the S_Music asset into the Viewport.

This will create an AmbientSound actor with S_Music as the sound source. This actor will automatically play S_Music when the game starts.
Press Play to listen to the music. After 17 seconds (the length of the music), it will loop and play again.

Next, you will add a sound effect whenever the muffin takes a step. To do this, you will use an Animation Notify.
What is an Animation Notify?
An Animation Notify allows you to trigger an event at a specific point in an animation. You can use them in many different ways. For example, you could create a Notify to spawn a particle effect.

In this game, the restart button appears as soon as the muffin touches the ground. However, using a Notify, you could make it appear at the end of the death animation.

In this tutorial, you will Animation Notifies to play a sound when each foot hits the ground.
Creating an Animation Notify
Navigate to the Characters\Muffin folder and then open SK_Muffin_Walk. This will open the Animation editor.
In the panel below the Viewport, you will see an area called Notifies. The light grey area is a Notify Track. This is where you will create and manage your Notifies.

Frame 10 and frame 22 are when each foot hits the ground so you will need to create a Notify at both of these points. To create a Notify, right-click on the Notify Track and select Add Notify\Play Sound. This will create a Notify called PlaySound.

Next, you need to position the Notify so that it occurs on frame 10.
Moving an Animation Notify
It’s a bit hard to know where to move the Notify to because the Notify Track doesn’t indicate where frame 10 is. However, you can display a marker by using the Timeline.
First, go to the Timeline located at the bottom of the panel. Drag-click the red playhead and release when Current Frame is 10. Make sure to pause it first!

Now, the Notify Track will have a red line indicating where the playhead is.

Drag-click the PlaySound Notify and release when it aligns with the red line.

Next, you need to tell the Notify to play the footstep sound.
Playing the Footstep Sound
Left-click on PlaySound to select it and then go to the Details panel. In the Anim Notify section, set Sound to S_Footstep.

Next, repeat the process for the other foot. Do the following:
- Create another Play Sound Notify
- Move the Notify to frame 21
- Set the Notify’s sound to S_Footstep

Now, whenever the walk animation reaches frame 10 and frame 21, the Notifies will trigger and play the S_Footstep sound.
Close SK_Muffin_Walk and then go back to the main editor. Press Play and start walking around to hear the footsteps.

After listening to the footsteps repeatedly, players may notice something. It’s the same sound effect each time! If only there were some way to vary the sound each time.
In the next section, you will play a sound effect when the player touches a cloud. But this time, you will vary the sound each time using a Sound Cue.
What is a Sound Cue?
A Sound Cue is an asset that allows you to manipulate multiple sounds and combine them. You can then treat the Sound Cue as its own sound. Anywhere you can use a regular sound, you can use a Sound Cue instead.
Here is an example of a Sound Cue using a Concatenator to play three sounds in succession:

If you use a Random node instead, you can select a random sound every time you play the Sound Cue.

In this tutorial, you will create and use a Sound Cue to change the pitch of a sound.
Creating a Sound Cue
First, navigate back to the Audio folder. You will use S_Pop as the sound effect so you will need to create a Sound Cue for it. To do this, right-click on S_Pop and select Create Cue.

This will create a new Sound Cue asset named S_Pop_Cue. Double-click on S_Pop_Cue to open it in the Sound Cue editor.
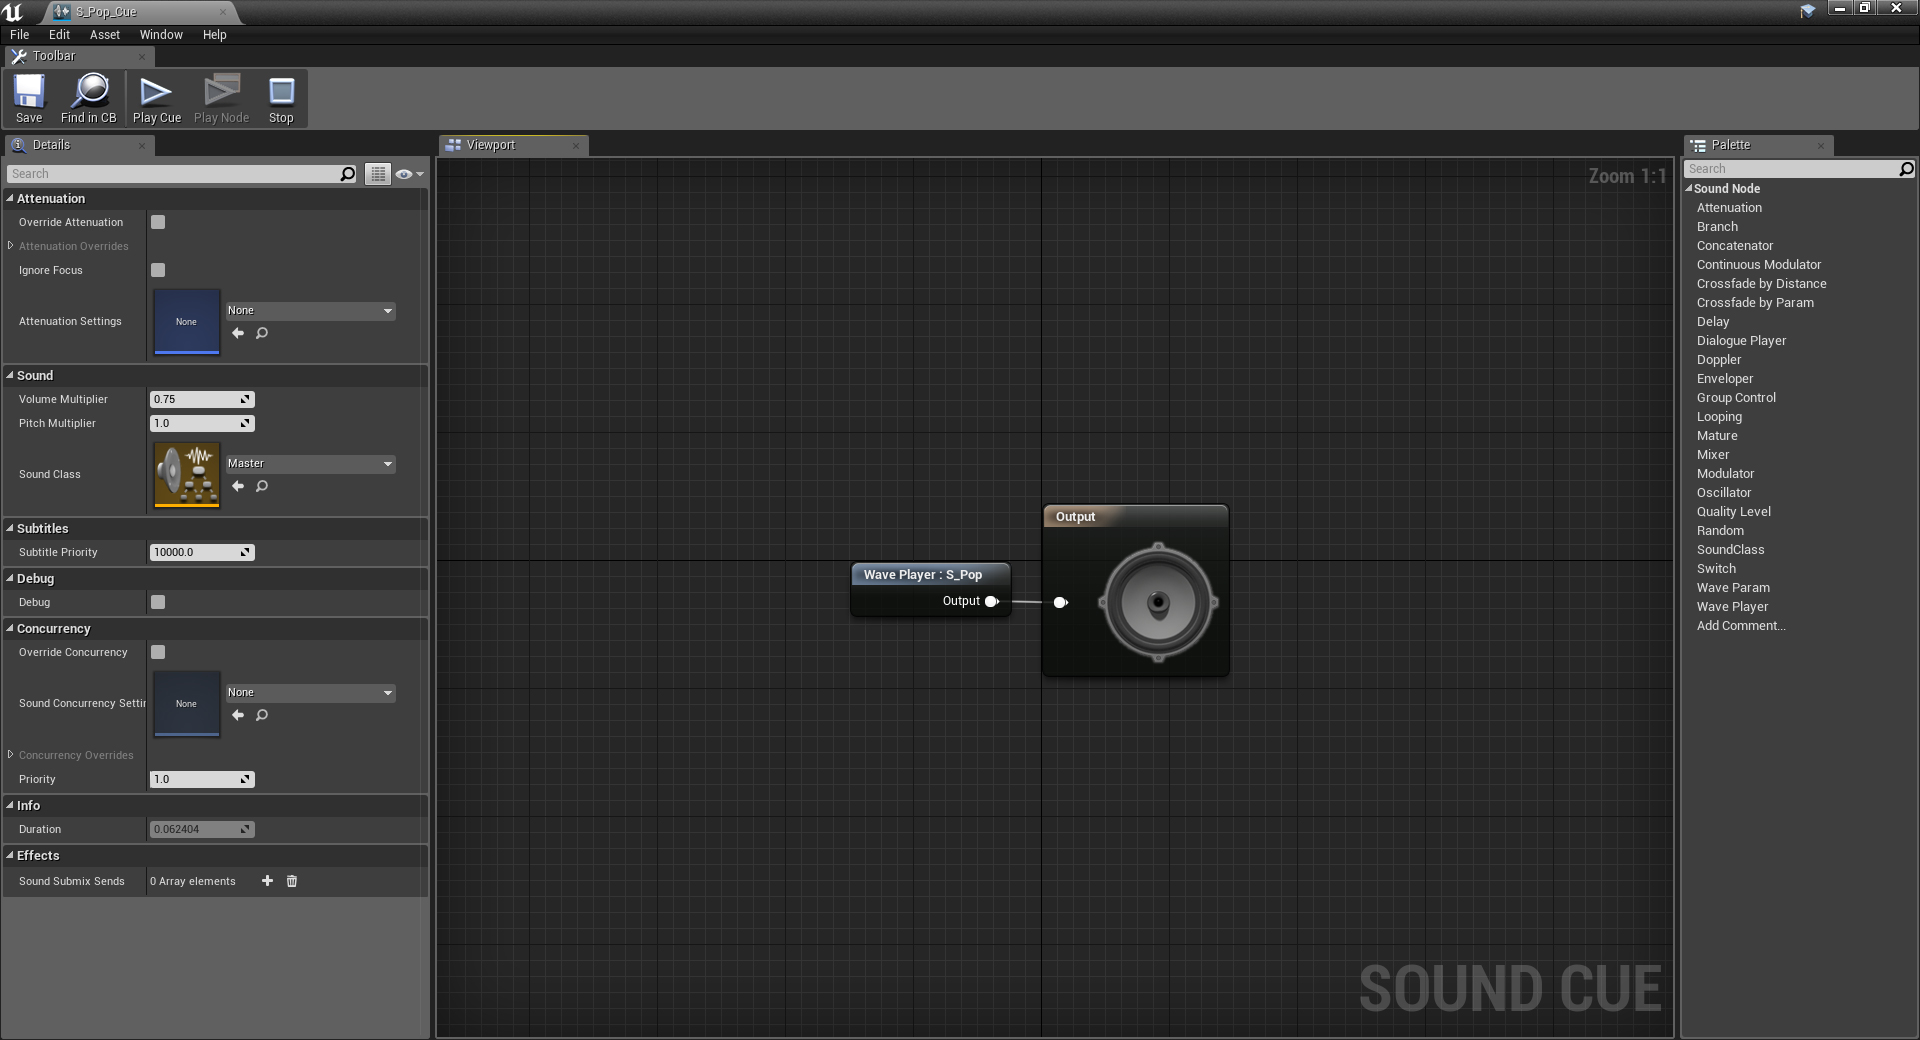
In the graph, you will see two nodes: Wave Player: S_Pop and Output. The Sound Cue will play whatever you connect to the Output node (in this case, it will play the S_Pop sound). You can listen to the Sound Cue by going to the Toolbar and clicking Play Cue.

Next, you will learn how to change the pitch of a sound.
Changing the Pitch of a Sound
To change the pitch of a sound, you need to use a Modulator node. Create one and connect it like so:

Now, you need to define how much the pitch can change. Select the Modulator node and then go to the Details panel. You will see two fields relating to pitch: Pitch Min and Pitch Max. Values less than 1 indicate the pitch can be lowered and vice versa. A value of 1 indicates the pitch will stay the same.
For this tutorial, the pitch should only be able to be raised. Set Pitch Min to 1.0 and Pitch Max to 2.0.

Now, every time you play the Sound Cue, the sound will have a pitch between the original pitch and double the original pitch.
Next, you need to play the Sound Cue when the player touches a cloud.
Playing a Sound Cue
Go back to the main editor and navigate to the Blueprints folder. Open BP_Cloud and then open the CloudTouched function. This function executes whenever the player touches a cloud so it is the perfect place to play the Sound Cue.
There are two nodes you can use to play a sound:
- Play Sound 2D: Plays a sound without any attenuation or spatialization (you will learn about these later in the tutorial). Use this node for sounds that don’t "exist" in the game world such as music and UI sounds.
- Play Sound at Location: Plays a sound at a location in 3D space. Use this node if you want the sound to change depending on the player’s location and orientation.
Since the cloud exists in the game world, the sound should also exist within the game world. Add a Play Sound at Location node to the end of the node chain.

Afterwards, set Sound to S_Pop_Cue.

Now, whenever the player touches a cloud, S_Pop_Cue will play.
Click Compile and then go back to the main editor. Press Play and start playing the game. Every time you touch a cloud, you should hear the same sound but at different pitches.

The sound’s pitch changes but it doesn’t sound like it is in 3D space. To enable this you need to spatialize the sound.
What is Spatialization?
Spatialization is a process performed to give the impression that the audio exists in 3D space. Sounds coming from the left will be heard in the left ear and vice versa.

In addition to increasing immersion, spatialization can also help aid gameplay. In competitive games like Overwatch and Counter-Strike, spatialized audio can help players discern the location of other players.
In this tutorial, you will use spatialization to pan the cloud’s sound based on its location.
Enabling Spatialization
There are two ways to enable spatialization for a Sound Cue:
- Sound Attenuation asset: This asset contains settings relating to attenuation and spatialization. You can assign this asset to different sounds to make sure they all have the same settings.
- Override Attenuation: Instead of using a Sound Attenuation asset, you can specify the settings within the Sound Cue. This allows you to create settings for individual sound cues.
For this tutorial, you will use the second method. Open S_Pop_Cue and then go to the Details panel. Locate the Attenuation section and enable Override Attenuation. This will enable the Attenuation Overrides section.

To check if spatialization is enabled, click the arrow next to Attenuation Overrides. The Spatialize setting will indicate if your sound is spatialized.

That’s it for the settings so go ahead and close S_Pop_Cue. Next, you need to specify where the sound is in 3D space.
Playing a Sound in 3D Space
Open BP_Cloud and then create a GetActorLocation node. Afterwards, connect it to the Location pin of the Play Sound at Location node.

Now, the sound will play at the same location as the cloud.
Click Compile and then go back to the main editor. Press Play and start touching clouds. You should hear sounds seemingly coming from different locations.

You may have noticed that some of the clouds have rain. But it’s not really a rain cloud if it doesn’t sound like it’s raining! Next, you will add a rain sound and use attenuation to change its volume depending on how far away it is.
Adding the Rain Sound
Instead of using a node to play the rain sound, you can use an Audio component instead. One of the advantages to using a component is that it will automatically play at the cloud’s location.
Open BP_Cloud and then go to the Components panel. Add a new Audio component and name it RainAudio.
Go to the Details panel and locate the Sound section. Change Sound to S_Rain.

The rain sound should not play for normal clouds. This means you need to deactivate RainAudio for normal clouds. To do this, scroll down to the Activation section and disable Auto Activate.

Now, you need to activate RainAudio for rain clouds. A good place to do this is the EnableRain function. This function executes if the cloud should be a rain cloud. Open the EnableRain function and add the highlighted nodes:

Next, you need to enable attenuation and define the attenuation settings
Setting Up Attenuation
Go to the Components panel and select RainAudio. Go to the Details panel and go to the Attenuation section. Enable the Override Attenuation setting.
The attenuation settings replicate how a sound loses its volume over distance. Under the Attenuation Overrides area, there are two settings you will use:
- Radius: The maximum distance the player can be before the volume begins to fade
- Falloff Distance: The distance the player needs to be before the sound becomes silent. This distance is in addition to the radius.
Take a look at the example below:

When the player is within the inner circle (defined by Radius), the volume is at 100%. As the player moves from the inner circle to the edge of the outer circle (defined by Falloff Distance), the volume fades to 0%.
For this tutorial, set Radius to 300 and Falloff Distance to 400.

This means the sound’s volume will be 100% when the player is less than 300 units away from the sound. As the player’s distance approaches 700 (300 + 400) units, the volume will fade to 0%.
If the player hasn’t moved out of the attenuation range when the cloud disappears, the sound will cut out. To fix this, you can fade out the sound.
Fading Out a Sound
Switch to the Event Graph and locate the FadeOut event. You can do this by going to the My Blueprint panel and going to the Graphs section. Double-click on FadeOut listed under EventGraph.
Add the highlighted nodes to the end of the node chain:

FadeOut executes when a player touches the cloud. The Timeline (FadeTimeline) node outputs a value (Alpha) that goes from 1 to 0 over a specified duration. By using this value, the volume of RainAudio will fade.
There’s one setting you need to change in S_Rain before you can hear it in action. When a sound’s volume is 0%, it will stop playing. Since you are beyond listening range when the audio starts, the volume of S_Rain will be 0%. When you move into listening range, you won’t hear anything.

You can fix this by using the Virtualize when Silent setting. This setting will always play the sound, regardless of its volume.
Click Compile and then close BP_Cloud. Navigate to the Audio folder and open S_Rain. Go to the Sound section and enable Virtualize when Silent.

Now, S_Rain will play even if it is silent. Close S_Rain and then go back to the main editor. Press Play and then move into range of the rain clouds to hear the rain sound.

In the final section, you will control the volume of the sounds using Sound Classes and Sound Mixes.
Sound Classes and Sound Mixes
A Sound Class is an easy way to group multiple sounds. For example, you can group all the music in one class and sound effects into another.

To adjust properties of a Sound Class (volume, pitch etc.) during gameplay, you need to use a Sound Mix. A Sound Mix is basically a table and each entry in the table is a Sound Class. Each entry contains the adjustments the Sound Class should have.
Here is an example of what a Sound Mix could contain:

By using the Sound Mix above, every sound in the Music class would play at half volume. Every sound in the Effects class would have its pitch doubled.
First, you will create the Sound Classes.
Creating the Sound Classes
In this tutorial, you will adjust the volume of the music and effects independently. This means you will need two Sound Classes. In the Content Browser, click Add New and select Sounds\Sound Class. Rename the Sound Class to S_Music_Class.
Create another Sound Class and name it S_Effects_Class.

Next, you need to assign each sound to a Sound Class. First, you will do it for the music. Open S_Music and then locate the Sound section. Change Sound Class to S_Music_Class.

Once you have done that, close S_Music.
Next up are the sound effects. Instead of opening each sound up and assigning a Sound Class, you can do it all at once. First, select the following assets:
- S_Footstep
- S_Pop_Cue
- S_Rain
Afterwards, right-click on one of the selected assets. Select Asset Actions\Bulk Edit via Property Matrix. This will open the assets in the property matrix editor.

The property matrix editor allows you to edit common properties at the same time.
Go to the Details panel and expand the Sound branch. To select a Sound Class, click the grid icon to the right of Sound Class.

Select S_Effects_Class and then close the property matrix editor.
All the sounds are now in their appropriate Sound Class. Next, you will create a Sound Mix and adjust it using Blueprints.
Creating and Adjusting a Sound Mix
In the Content Browser, click Add New and select Sounds\Sound Mix. Rename the Sound Mix to S_Volume_Mix.
To control the volume of each Sound Class, you will use sliders. I’ve already created a widget with two sliders for you to use. Navigate to the UI folder and open WBP_Options.

To adjust the volume, you need to use the value from these sliders and feed it into the Sound Mix. You will do this for the music first.
Switch to the Graph mode and then go to the My Blueprints panel. Under the Variables section, select MusicSlider. Go to the Details panel and click the button next to On Value Changed.

This will create the On Value Changed (MusicSlider) event. This event fires whenever you move the slider handle.

Now, you need to set the volume of S_Music_Class within S_Volume_Mix. To do this, you need to use a Set Sound Mix Class Override node. This node allows you to specify a Sound Mix and a Sound Class. If the Sound Class is not in the Sound Mix, it will be added. If it is already in the Sound Mix, it will update.
Add a Set Sound Mix Class Override node and set the following options:
- In Sound Mix Modifier: S_Volume_Mix
- In Sound Class: S_Music_Class
- Fade in Time: 0 (This will make sure the volume adjustments are instantenous)

Next, connect your nodes like so:

Repeat the steps for EffectsSlider. Change the In Sound Class pin to S_Effects_Class.

Now, whenever the value of a slider changes, S_Volume_Mix will adjust the volume of the relevant Sound Class.
Before any of this will work, you need to activate the Sound Mix.
Activating a Sound Mix
For a case like this (volume control using the UI), it’s best to activate the Sound Mix when the game starts. This is so the Sound Class will automatically use the volume adjustments from the Sound Mix. However, for the sake of simplicity, you will activate the Sound Mix within the widget.
Create an Event Pre Construct node. This is similar to the Event BeginPlay node found in Blueprints.

To activate a Sound Mix, you need to use the Push Sound Mix Modifier node. Create one and connect it to Event Pre Construct. Afterwards, set In Sound Mix Modifier to S_Volume_Mix.

This will activate S_Volume_Mix when WBP_Options spawns.
Click Compile and then close WBP_Options. Press Play and then press the M key to bring up the sliders. Adjust the sliders to affect the volume of each Sound Class.

Where to Go From Here?
You can download the completed project here.
As you can see, it’s pretty easy to get your audio running in Unreal Engine 4. If you’d like to learn more about the audio system, check out the official documentation. You can do other cool things like adding reverb and EQ. Also, be sure to check out the features of the new audio engine when it arrives!
If you want to keep learning, check out the next post in the series, where I’ll show you how to create particle effects.


Comments