How to Create a Simple Game in Unreal Engine 4
In this Unreal Engine 4 tutorial, you will create a first-person endless game. You will learn how to generate random obstacles and restart the game.

If you’re starting out in game development, one of the common pieces of advice is to create a basic game. This is because it teaches you how to create simple mechanics and how objects interact with each other.
In this tutorial, you will create a first-person game that continues indefinitely. You will learn how to:
- Move the player forward continuously
- Generate obstacles the player must avoid
- Randomize the obstacles to create variations
- Create a restart button that displays when the player hits an obstacle
At the end, you will have a game that looks like this:

Please note, you will be using Blueprints and UMG in this tutorial. If you need a refresher, check out our Blueprints and UI tutorial.
- Part 1: Getting Started
- Part 2: Blueprints
- Part 3: Materials
- Part 4: UI
- Part 5: How To Create a Simple Game (you are here!)
- Part 6: Animation
- Part 7: Audio
- Part 8: Particle Systems
- Part 9: Artificial Intelligence
- Part 10: How to Create a Simple FPS
Getting Started
Download the starter project and unzip it. Go to the project folder and open InfiniteMatrix.uproject.
Press Play to test out the movement controls. You can move vertically and horizontally by moving your mouse.

The first thing you will do is make the player move forward continuously.
Moving the Player Forward
Navigate to the Blueprints folder and open BP_Player.
To move the player forward, you will add an offset to the player’s location each frame.
First, you need to create a variable to define the speed of the player’s forward movement. Create a Float variable named ForwardSpeed and set its default value to 2000.

Next, make sure you are in the Event Graph and then locate the Event Tick node. Create the following setup:

By multiplying ForwardSpeed with Delta Seconds, you get a frame rate independent result.
Next, you will use this result to move the player along a single axis.
Moving Along a Single Axis
To move the player, create an AddActorWorldOffset node. Set Sweep to true by left-clicking its checkbox.

If you try to connect the Float result to the Delta Location input, Unreal will automatically convert it to a Vector.

However, this will put the Float value into the X, Y and Z components of the Vector. For this game, the forward movement should only be along the X-axis. Luckily, you can split a Vector into three Float components.
Make sure the Delta Location pin of the AddActorWorldOffset node has no connections. Right-click the Delta Location pin and select Split Struct Pin.

Finally, connect everything like so:

Let’s recap:
- Every frame, the game will multiply ForwardSpeed and Delta Seconds to get a frame rate independent result
- The AddActorWorldOffset will use the result to move the player along the X-axis
- Since Sweep is enabled, the player will stop moving forward if anything blocks it
Click Compile and then go back to the main editor. If you press Play, you will move through the tunnel.

Instead of placing tunnels manually, you can create a Blueprint that spawns tunnels automatically.
Creating the Tunnel Spawner
Go to the Content Browser and make sure you are in the Blueprints folder. Create a new Blueprint Class with Actor as the parent class. Name it BP_TunnelSpawner and then open it.
Since the game will be spawning tunnels constantly, it’s a good idea to create a spawning function. Go to the My Blueprint panel and create a new function named SpawnTunnel. The purpose of this function will be to spawn a tunnel at a provided location.
To pass a location to the function, the function needs an input parameter. These will appear as input pins when you call the function.

They will also appear as output pins on the Entry node of the function.

Let’s go ahead and create an input parameter. Make sure you are in the graph for the SpawnTunnel function. Select the Entry node and then go to the Details panel. Click the + sign next to the Inputs section.
![]()
Rename the input parameter to SpawnLocation and change its type to Vector.

To spawn a tunnel, add a Spawn Actor From Class node. Click the drop-down located to the right of the Class pin and select BP_Tunnel.

To set the spawn location, right-click the Spawn Transform pin and select Split Struct Pin. Afterwards, link the Spawn Actor From Class node to the Entry node like so:

Now, whenever you call the SpawnTunnel function, it will spawn an instance of BP_Tunnel at the provided location.
Let’s test it out!
Testing the Tunnel Spawner
Switch to the Event Graph and locate the Event BeginPlay node. Add a SpawnTunnel node and connect it to the Event BeginPlay node.
On the SpawnTunnel node, set Spawn Location to (2000, 0, 500).

Now, when the game starts, it will spawn a tunnel up and away from the player. Click Compile and then go back to the main editor.
First, delete BP_Tunnel from the level. Do this by left-clicking on BP_Tunnel in the World Outliner. Afterwards, press the Delete key to remove it from the level.
Next, go to the Content Browser. Left-click and drag BP_TunnelSpawner into the Viewport. This will add an instance of it to the level.
If you press Play, the game will spawn a tunnel above and away from the player.

Once you are done testing, go back to BP_TunnelSpawner. Reset the Spawn Location of the SpawnTunnel node to (0, 0, 0).
Afterwards, click Compile and then go back to the main editor.
In the next section, you will set up functionality for BP_Tunnel.
Setting up the Tunnel Blueprint
BP_Tunnel will be responsible for two things. The first is detecting when the game should spawn a new tunnel. To do that, you will create a trigger zone. Once triggered, BP_Tunnel will tell BP_TunnelSpawner to spawn a new tunnel. By doing this, you can create the illusion of an endless tunnel.

The second thing it will do is define a spawn point. BP_TunnelSpawner will then use this point as the next spawn location.
Let’s start with creating the trigger zone.
Creating the Trigger Zone
Open BP_Tunnel and then go to the Components panel. Add a Box Collision component and name it TriggerZone.
The collision area is quite small at the moment. Go to the Details panel and locate the Shape section. Set the Box Extent property to (32, 500, 500).
![]()
Next, set the Location property to (2532, 0, 0). This will place TriggerZone right at the end of the tunnel mesh. This means a new tunnel should only spawn when the player reaches the end of a tunnel.

Now, it’s time to create the spawn point
Creating the Spawn Point
To define the location of the spawn point, you can use a Scene component. These components are perfect for defining locations because they only contain a Transform. They are also visible in the Viewport so you can see where your spawn point is.
Go to the Components panel and make sure you don’t have anything selected. Add a Scene component and rename it to SpawnPoint.

The tunnel mesh is 2500 units long on the X-axis so that’s where the attach point should be. Go to the Details panel and set the Location property to (2500, 0, 0).

The next thing to do is to create a function that spawns a tunnel at SpawnPoint.
Spawning Tunnels at the Spawn Point
Click Compile and then switch to BP_TunnelSpawner.
The next BP_Tunnel should spawn at the SpawnPoint of the furthest tunnel. By doing this, the tunnel will always continue.

Since the furthest tunnel is always the last spawned tunnel, you can easily get a reference to it.
Open the graph for SpawnTunnel. Right-click the Return Value pin of the Spawn Actor From Class node. Select Promote to Variable and rename the variable to NewestTunnel.

Now, you will always have a reference to the furthest tunnel.
Next, create a new function and name it SpawnTunnelAtSpawnPoint. Create the following graph:

This setup will get the newest tunnel and the location of its SpawnPoint component. It will then spawn a new tunnel at this location.
In order for BP_Tunnel to communicate with BP_TunnelSpawner, it needs a reference. Without communication, BP_TunnelSpawner won’t know when to spawn the next tunnel.
Creating a Reference to the Tunnel Spawner
Click Compile and then close the SpawnTunnelAtSpawnPoint graph. Afterwards, switch to BP_Tunnel.
Add a new variable and name it TunnelSpawner. Set its Variable Type to BP_TunnelSpawner\Object Reference.

Click Compile and then switch back to BP_TunnelSpawner.
Open the graph for SpawnTunnel and add the indicated nodes:

Now, every tunnel will have a reference to BP_TunnelSpawner.
Next, you will tell BP_TunnelSpawner to spawn the next tunnel when the player enters TriggerZone.
Scripting the Trigger Zone
Click Compile and then switch to BP_Tunnel.
Go to the Components panel and right-click on TriggerZone. Select Add Event\Add OnComponentBeginOverlap. This will add the following node to your Event Graph:

This node will execute whenever another Actor overlaps TriggerZone.
First, you should check if the Actor that overlapped TriggerZone is the player.
Left-click and drag the Other Actor pin. Release left-click on an empty area and select Cast to BP_Player from the menu.

Next, add the indicated nodes after the Cast to BP_Player node:

Let’s go through this step-by-step:
- When an Actor overlaps the TriggerZone, the On Component Begin Overlap (TriggerZone) node will execute
- The Cast to BP_Player node checks if the overlapping Actor is the player
- If it is the player, then BP_TunnelSpawner will spawn a new tunnel. Its location will be at the SpawnPoint component of the last spawned tunnel.
- Since there is no more use for the old tunnel, the game removes it using the DestroyActor node
Click Compile, go back to the main editor and then press Play. Once you reach the end of a tunnel, the game will spawn a new one.

Although the game is endlessly spawning tunnels, it doesn’t look endless. You can mitigate this by always having a few tunnels visible. Later on, when you combine this with obstacles, the player won’t be able to see the tunnels spawning in.
Spawning More Tunnels
The first thing to do is create a function that spawns a certain number of tunnels.
Open BP_TunnelSpawner and create a new function called SpawnInitialTunnels.
To spawn a specified number of tunnels, you can use a ForLoop node. This node will execute connected nodes a specified amount of times. Add a ForLoop node and connect it to the Entry node.

To make the ForLoop node execute n amount of times, you need to set Last Index to n – 1.
For this tutorial, you will spawn three tunnels. To perform three loops, set the Last Index value to 2.

When the game starts, the player should always start in a tunnel. To do this, you can spawn the first tunnel at the player’s location.
Spawning the First Tunnel
To determine if the first tunnel has spawned, you can check if NewestTunnel is set. If it is not set, that means the first tunnel has not spawned. This is because NewestTunnel is only set after the game spawns a tunnel.
To perform this check, add an IsValid node (the one with a question mark icon) after the ForLoop node.
Next, get a reference to NewestTunnel and connect it to the Input Object pin of the IsValid node.

If NewestTunnel is not set, the Is Not Valid pin will execute and vice versa.
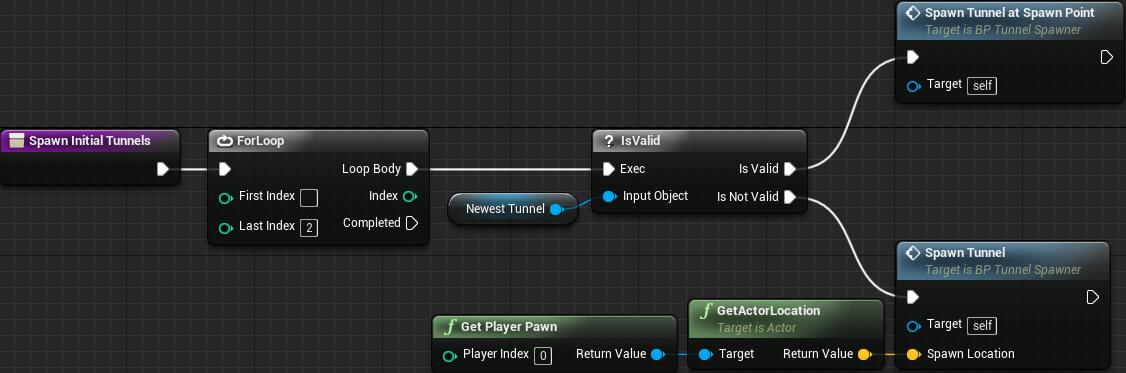
Add the following and connect it to the Is Not Valid pin of the IsValid node:

This setup will spawn a tunnel at the location of the player Pawn.
Next, you will spawn the subsequent tunnels.
Spawning Subsequent Tunnels
Add a SpawnTunnelAtSpawnPoint node and connect it to the Is Valid pin of the IsValid node.

Here is the final graph:
Summary:
- The ForLoop node will execute a total of three times
- On the first loop, it will spawn a tunnel at the player’s location
- During the subsequent loops, it will spawn a tunnel at the SpawnPoint of the newest tunnel
Next, go to the Event Graph and delete the SpawnTunnel node. Afterwards, add a SpawnInitialTunnels node after Event BeginPlay.

Now, when the game starts, it will spawn three tunnels.
Click Compile, go back to the main editor and then press Play. The tunnel is now much longer!

The game isn’t very challenging at the moment so let’s add some obstacles.
Creating Obstacles
Here are the meshes you will use as obstacles:

Open BP_Tunnel and go to the Components panel. Add a Static Mesh component and name it WallMesh.
Go to the Details panel and change its Static Mesh property to SM_Hole_01.
Next, set its Location property to (2470, 0, 0). This will place it at the end of the tunnel.

To make the game more interesting, the walls will also be rotating. Add a new Float variable and name it RotateSpeed. Set the Default Value to 30.
Switch to the Event Graph and locate the Event Tick node. Create the following setup:

This will make WallMesh rotate every frame by the supplied amount.
Click Compile and then go back to the main editor. Press Play to see the spinning walls.

Let’s spice it up by adding some variations to the walls.
Creating Wall Variations
Instead of creating a new Blueprint for every variation, you can just randomize WallMesh.
Open BP_Tunnel and create a new function called RandomizeWall. Afterwards, create the following graph:

As its name suggests, the Set Static Mesh node will set WallMesh to the supplied mesh.
To make a list of static meshes, you can use a Select node.
Left-click and drag the New Mesh pin. Release left-click on an empty area and then add a Select node.

The Select node allows you to set a list of options. The Index input determines what option the Select node outputs.
Since there are four wall meshes available, you need to create two more Option pins. You can do this by right-clicking the Select node and selecting Add Option Pin. Do this until you have four Option pins.

Next, set each option to the following:
- Option 0: SM_Hole_01
- Option 1: SM_Hole_02
- Option 2: SM_Hole_03
- Option 3: SM_Hole_04

Now, let’s select a random option.
Randomizing the Wall
You can use a Random Integer in Range node to get a random number. This node will return a value that is >= Min and <= Max.
Add a Random Integer in Range node and connect it to the Index pin of the Select node.

Set the Max value to 3. This will give you four possible numbers: 0, 1, 2 and 3.

To create a bit more randomization, let’s add a random rotation to WallMesh. Add the following after the Set Static Mesh node:

This will add a random rotation between 0 and 360 degrees to WallMesh.
Here is the final graph:
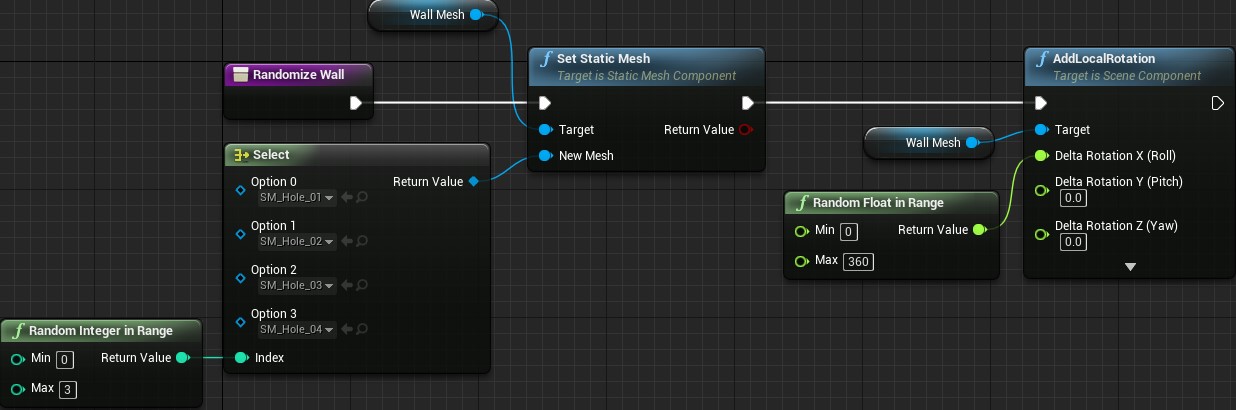
Summary:
- The Select node provides a list of meshes
- A random mesh is chosen using the Random Integer in Range node
- The Set Static Mesh node sets the WallMesh to the chosen mesh
- The AddLocalRotation node adds a random rotation offset to WallMesh
Click Compile and then close the RandomizeWall graph.
Switch to BP_TunnelSpawner and open the SpawnTunnel graph. Add the highlighted node:

Now, whenever a tunnel spawns, it will have a random wall mesh.
Close the SpawnTunnel graph and then click Compile. Go back to the main editor and press Play to see all the wall variations!

If you hit a wall, you will stop moving forward. However, if you move around and go through a hole, you will start moving forward again.
The next step is to disable forward movement when the player collides with a wall.
Handling Wall Collisions
To enable or disable forward movement, you can use a Boolean variable. These only have two states: true and false.
Open BP_Player and then create a new Boolean variable named IsDead.
Next, go to the Event Tick node and create a Branch node.
Afterwards, get a reference to IsDead and connect it to the Condition pin of the Branch node.

Connect the Event Tick node to the Branch node. Afterwards, connect the False pin of the Branch node to the AddActorWorldOffset node.
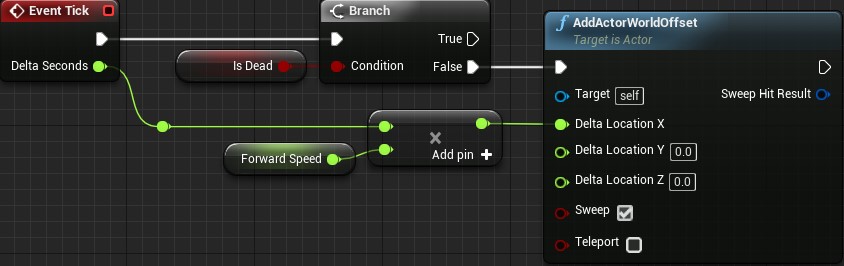
Now, whenever IsDead is set to true, the player will stop moving forward.
Next, let’s set the IsDead variable when the player hits a wall.
Setting the IsDead Variable
Click Compile and then switch to BP_Tunnel. In the Components panel, right-click on WallMesh and select Add Event\Add OnComponentHit. This will add the following node to your Event Graph:

This node will execute whenever another Actor collides with WallMesh.
First, you need to check if the Actor that collided with WallMesh is the player.
Left-click and drag the Other Actor pin. Release left-click on an empty area and select Cast to BP_Player from the menu.

Next, left-click and drag the BP_Player pin of the Cast to BP_Player node. Release left-click on an empty space and then add a Set Is Dead node.
Set IsDead to true by left-clicking the checkbox.

Click Compile and then go back to the main editor. Press Play and try hitting a wall. If you move around to a hole, you will no longer move through it.

In the next section, you will display a restart button when the player hits a wall.
Displaying a Restart Button
The widget that you will display is named WBP_Restart. You can find it in the UI folder. This is what it looks like:

To display or hide the widget, you need a reference to it. Open BP_Player and then create a new variable named RestartWidget. Change the Variable Type to WBP_Restart\Object Reference.

Next, go to the Event Graph and locate the Event BeginPlay node.
Add a Create Widget node and set the Class value to WBP_Restart.
Afterwards, add a Set Restart Widget node and then connect everything like so:

Now, when the player spawns, it will create an instance of WBP_Restart. The next step is to make a function that displays this instance.
Creating the Display Function
Create a new function and name it DisplayRestart. Once you have done that, create the following graph:

Summary:
- Add to Viewport will show RestartWidget on the screen
- Set Input Mode UI Only will limit the player’s interactions to the UI. This is so the player can’t move around while they are dead.
- As its name suggets, Set Show Mouse Cursor simply displays the mouse cursor
To display the restart button, all you need to do is call DisplayRestart after the player collides with a wall.
Calling the Display Function
Close the DisplayRestart graph and then click Compile.
Switch to BP_Tunnel and then locate the On Component Hit (WallMesh) node.
Add a DisplayRestart node to the end of the node chain.

Click Compile and then close BP_Tunnel. Go back to the main editor and press Play. If you hit a wall, the restart button will appear.

The last step is to restart the game when the player clicks the button.
Restarting the Game
There are two things the game needs to do when restarting:
- Reset the player. This includes removing the restart button from the screen.
- Respawn the tunnels. This is so the player starts at the beginning of the tunnel.
Let’s start with resetting the player.
Resetting the Player
Open BP_Player and then create a new function called RestartGame. Create the following graph:

Summary:
- Set Is Dead sets IsDead to false. This re-enables forward movement.
- Remove From Parent removes RestartWidget from the screen
- Set Input Mode Game Only re-enables game input so the player can move around
- Set Show Mouse Cursor hides the mouse cursor
Next, let’s respawn the tunnels.
Respawning the Tunnels
Click Compile and then close BP_Player.
Open BP_TunnelSpawner and make sure you are in the SpawnInitialTunnels graph.
First, you need to remove the existing tunnels before you spawn new ones.
Add a Sequence node after the Entry node. Connect the Then 1 pin to the ForLoop node.

Next, create the following nodes:

This setup will get all the existing tunnels and remove them from the game.
Finally, connect the Then 0 pin of the Sequence node to the Get All Actors of Class node. This will make sure the tunnels are removed before the spawning process.
Here is the final graph:

The last thing to do is handle the button click.
Handling Button Clicks
Click Compile and then close BP_TunnelSpawner.
Go to the Content Browser and navigate to the UI folder. Double-click on WBP_Restart to open it.
Select RestartButton and then go to the Details panel. Go to the Events section and click the button next to OnClicked.

This will create a node called On Clicked (RestartButton). This node will execute when the player clicks on RestartButton.
Recreate the following:

Summary:
- Get Owning Player Pawn returns the Pawn that the player is currently controlling
- Cast to BP_Player checks if the Pawn is of class BP_Player
- If it is, it will call the RestartGame function. This function resets the player and hides the restart button.
- Get All Actors of Class and Get returns BP_TunnelSpawner and then calls SpawnInitialTunnels. This function will remove existing tunnels and spawn new ones.
Click Compile and then close the Blueprint editor. Press Play to test out the restart button!

Where to Go From Here?
You can download the completed project here.
Now that you have a simple game, you can start building on it. Try adding a score counter that increases when the player avoids a wall.
You should also try to build classic games like Pong and Tetris. The mechanics of these games are simple but can be a challenge to implement.
If you’d like to learn how to make a specific type of game, leave a comment below!
If you want to keep learning, check out the next post in the series, where I’ll show you how to animate characters in your game using Blueprints.


Comments